Saturday, November 26, 2016

Progress report on the 1980 Mercian Olympic restoration

Ebay seller's picture. I wasn't sure if those two yellow bands on the seat tube were factory or not. Seems like they were, if so, that's an unusual feature.


It's been several months since I made a (somewhat) impulsive purchase of an older Mercian Olympic frame on eBay. I have been taking my time deciding how I wanted to set up this bike. I finally decided to go with a "modernized vintage" effect. I wanted this bike to fit more modern (130-135mm OLD) wheels. I also wanted to eliminate most of the "clamped-on" fittings, adding brazed on rear brake cable guides, shifter bosses and water bottle bosses. Might as well throw in a pump peg too!
The frame after Steve Rex's work, including brake cable guides, shifter bosses, pump peg and water bottle bosses.
As it happens, one of North America's biggest suppliers of frame builder's fittings and supplies is located just a couple of miles from my house! I visited Nova Cycle Supplies and arranged to pick up all the necessary bits for my Mercian. It's surprising how inexpensive these little bits are, of course, the real cost comes in brazing them onto the frame.

I then took the frame and parts down to Steve Rex's shop in Downtown Sacramento. He got all the bits attached in short order. I tried to do the spreading of the rear triangle myself. While attempting this, a small catastrophe occurred,  and I managed to separate the rear brake bridge from the seat stay, Yikes!

Back to Steve Rex for the repair. I must say the Steve did a really good job with the repair, although the left chainstay suffered a bit of a crimp from my mishandling, but it remained structurally sound. Everything looks good now. Lesson learned; although I had spread rear triangles in the past, this time the distance, (120 to 135mm), and the type of steel, (531 stays), demanded support at the brake bridge which I had neglected to do.

Fresh from Steve Rex's shop, showing the new shift bosses and pump peg.
After returning from the second trip to Rex's, I assembled the bike again to make sure everything was right. The bike rides very well; It's got the Mercian feel for me, stable, comfortable yet responsive.

Earlier test ride, before Steve Rex's work on the frame. Wow, those brake cables are long!
It was now time for paint. Since this bike is to be a workhorse rather than a showhorse, I had decided to have it powdercoated. Powdercoat is tough and compared to wet paint relatively cheap. Also, there are a lot of powdercoat shops in the Sacramento region, and very few bike painters. The disadvantage of powdercoat is that it can look heavy and cover up a steel frame's detail if not applied carefully. A friend of mine had a frame done by one shop that didn't look great, not bad, but not great, and they seemed to be a little shifty on pricing.

Another view of the head tube, after powder coat and lug lining.
I found one shop that actually mentioned bicycle frames on its webpage, Powder-Coat-It, on Roseville Road in North Sacramento. I brought the frame down and the girl there seemed to know what she was doing! Looking at their huge array of colors, I decided on a monochrome burgundy shade (RAL 3004, Claret Red, which was a close match to the original shade). I had applied some tape on the threaded surfaces I wanted left clean and had inserted bolts on the various bosses. She noted those, (they do their own masking and use nylon plugs to protect threads), and gave me the price of $165.

About a week later, the frame was done and I picked it up. I'm pretty happy with the results. Overall, the quality of the finish is very good, not too heavy at all, although there are one or two spots that seemed a little thicker than other areas.

A detail of the powder coat, you can still make out the "Campagnolo" on the dropout!


This shot shows off the lug lining I did with a "DecoColor" Pen.

I then applied "lug lining" by using a DecoColor gold fine-tipped pen. I practiced on my Nishiki before tackling the Mercian. The results look pretty good.

I've ordered a set of Mercian decals from Cyclomondo in Australia, along with the Reynolds 531 sticker.  The Mercian stickers match the original gold script the bike came with. I hope it mates well with the lug lining.
Stickers on order!
Awaiting new decals.

Stay tuned for updates!

Sunday, October 16, 2016

Looking for dirt, Stagecoach Trail, Auburn State Recreational Area.


The start of the dirt, just behind the kiosk at the SRA Kiosk.
I've been pretty slow in updating my blogs lately, seems to never be any time! Well, it's now October and rains are falling. I have a weekend to devote to catching up. One ride I wanted to document was a relatively short but interesting one. I wanted to find a dirt/gravel road close to my home in Loomis. While hiking "Training Hill" in the Auburn State Recreational Area, I spotted a dirt road across the canyon that looked rideable. I did a little research and found that there was indeed a path, Upper Stagecoach Trail, on which I might be able to ride the Mercian.

The start of the trail is behind the Kiosk located at the confluence of the forks of the American River, just past the Highway 49 bridge.

Screenshot of the plot of the ride.

A blow up of the same shot, showing the Stagecoach Trail section.

The heading photo shows the start of this trail, just behind the Kiosk and in the shadow of the Forresthill Bridge. Shortly past the point I hit the toughest section of the trail. Steep and very rocky, I was forced to dismount and walk for about 30 yards, not a very auspicious start for my hopes of gravel grinding! After that stretch, I was able to ride, although quite a bit of the first part was slow going, fairly rough and steep with a few sharp corners.

A picnic table afforded a good place for a break.
Eventually I became more comfortable with the terrain but it was still a pretty demanding ride, and slow going. At one point I was past by a fellow running! Oh well. The road gradually improved to the point where I was making good progress.

On Upper Stagecoach Trail

The end of the dirt is in sight...
Eventually I came to the gated end of the trail and hit the pavement at Russell Road, which,bearing left becomes Forresthill Avenue in Northeastern Auburn.

Looking back from Russell Road/Forresthill Avenue in Auburn.
This was a decent ride, a little rough and steep in parts, but the 37c Continental Tourride tires were adequate. I think 28c Paselas would have been at their limits on this ride. I might combine this ride with a YANKEE JIMS ROAD Yankee Jims Road ride someday to make a real dirt ride out of it!


Wednesday, August 10, 2016

Exploring Ponderosa Way

Ponderosa Way, heading south to the N. Fork of the American River
I recently discovered an interesting road I hadn't been aware of. While riding Placer Hills Road I had been searching for an alternate route back down toward home. It always looked like there was a frontage road that could take me from Weimar back down to Clipper Gap. Alas, I could find no such road, all the frontage roads on the south side of I-80 seemed to be dead ends. But I did discover Ponderosa Way, a road out of Weimar which seemed to continue through to Foresthill Road.

After doing a little research it seemed like Ponderosa Way should be ride-able. I put my 37C shod wheels on the Mercian to handle what was most probably a good long stretch of dirt road, and I wasn't disappointed!

Here's the plotted route I took, going in a clockwise direction.
 The first part of the ride is a conventional road ride up Placer Hills Road though Meadow Vista, eventually turning off that road at the Weimar Crossing intersection, climbing up to Weimare and the crossing over I-80. you then have to take a little jog to get to the frontage road where the "Welcome to Weimar" sign stands. You are now on Ponderosa Way!
 
On Ponderosa Way, just crossing I-80. (This was taken on my scouting ride, hence the "skinny" 28C tires!)
 You will follow Ponderosa through some nice country roads, a curvy, rolling course that takes you to the entrance of the Auburn State Rec. Area.


You'll go about a mile or so on easy paved roads until you reach this gated point, where the pavement ends.


Now you begin a long, dusty and rough descent to the North Fork of the American river. This road is rough. There are lots of eroded channels in it and plenty of stones. I needed to ride my brakes more than I cared to. At one point I stopped to let the rims cool a bit. Disc brakes would be useful here. The road is in worse condition that Yankee Jims, you need to take your time...

A look southward, down the Canyon. The road snakes it's way down the hillside!


Finally, the river crossing!


Not the greatest bridge surface, but it worked.
Reaching the bottom, I paused for a bit to relax from the stress of the descent. There is a porta-potty at the bridge if you need it. It's a bit of a scramble down to the water.

The climb up from the bridge is moderately steep, again rocky and rough. I used 26f/28r gearing for the lower section and that was adequate. It is a tough going but fortunately, you're on the north facing side of the hills so there is some shade protecting you from the sun. I strongly suggest you do as I did and take this ride in a "clockwise" direction. Your descent into the canyon will be in the sun and your climb will be in the shade. I think descending on the shady side would also be tricky because you may not see the irregular contours of this rough road surface well enough to avoid some ruts, etc.


The vista point on the south side, looking back down into the canyon, you can see the road descending on the far side.
Eventually, you will come to a vista point on the right side of the road. No facilities here but its a nice place to stop and rest and take in the view. From this point on the road seems to improve ever so slightly and the gradient loosens up a bit.


You enter the pine tree level again and finally come to a sharp switchback which has a private gate at its apex. From this point the road improves, with some sort of tar surface on it, not quite asphalt, but not too bad.

Looking back, back on the blacktop!
Once you reach the county-maintained section of the road again, you are very close to Foresthill Road, coming out well above Drivers Flat Road. Its now the regular slog back to Auburn and home to Loomis!


Post ride shot of the bike with the 37C tires and a coating of dust.
I enjoyed this ride but must say that the condition of the road on Ponderosa was pretty poor. Hopefully somebody, (the state?), will see fit to do a little maintenance and grading soon. Still I was able to navigate the road with a touring bike and 37C tires, (actual measured width is 35C on my sun CR18 rims). A disc brake equipped gravel bike would be ideal for the road as it is now. I hope this description will encourage others to try it!


Monday, May 16, 2016

Mercian Man


Mercians Three!
I really enjoy my Mercians, riding them is a thrill, and the fit is just right. The latest
I bought was a 60cm, the first, bought new over 30 years ago, was a 58. Standard Mercian geometry dictates a relatively short top tube, about 56cm for up to the 61cm bikes. I suspected I could fit a 61cm Mercian fine.

Recently, I found a 1980 Mercian on EBay, it was described as a 58, but I could tell from the pictures it was a bit bigger. I decided to buy it, (it was a "Buy It Now" offering, the only kind I seem to win). When it arrived, it was indeed bigger; it turned out to be a 61! Now I get to try a 61 after all!

The frame is a 1980 Olympic, pretty much the bottom of the line for Mercian, but still a nice one with Reynolds 531 tubes and forks and Campagnolo dropouts. It is actually very similar to my Green 1983, except without the water bottle and brake cable guide braze-ons.
In the stand, working on some of the paint issues.
Overall, the frame is not in too bad of shape. The dropout adjusters were not frozen, but they were bent. There was something inside the top-tube that was rolling around, and there was some rough spots in the paint on the top tube.

I cut off and removed the old adjusters, I eventually drilled a hole in the tube inside the seat lug and eventually removed the weird ball of metallic grunge from the frame. I sanded the paint off the top tube and found some specks in the tube. After removing most of that I shot it with primer to protect it. I don't know how long it will be before I can paint the frame properly.

Headtube detail, I love the flat fork crown on these models.
Nice gold Mercian Script.
I like the color of this bike; when I repaint it I'll keep it a shade of Maroon and Gold Mercian stickers are readily available. I'm not sure how I will configure it, I initially thought of hanging all my old Campy Nouvo Record gear on it, but I could do that more easily on my '83. I thought of spreading out the rear triangle to 132.5mm to take a modern wheel, but then it would lose the charm of the 5 speed rear wheel.

Well, I'll have to take my time since it will take me a while to afford anything else. In the meantime, I now have three Mercians hanging in the garage!

Update Feb. 2017: Here's the gang together with the 1980 Olympic completed!


Sunday, February 14, 2016

Winter projects.

Circa 1974 Nishiki International
Winter's always a good time to spend in the workshop and this year is no exception. Except for the recent spate of nice weather which allowed some good riding, (I managed to get a ride around Folsom Lake in!), I've had plenty of time to work.

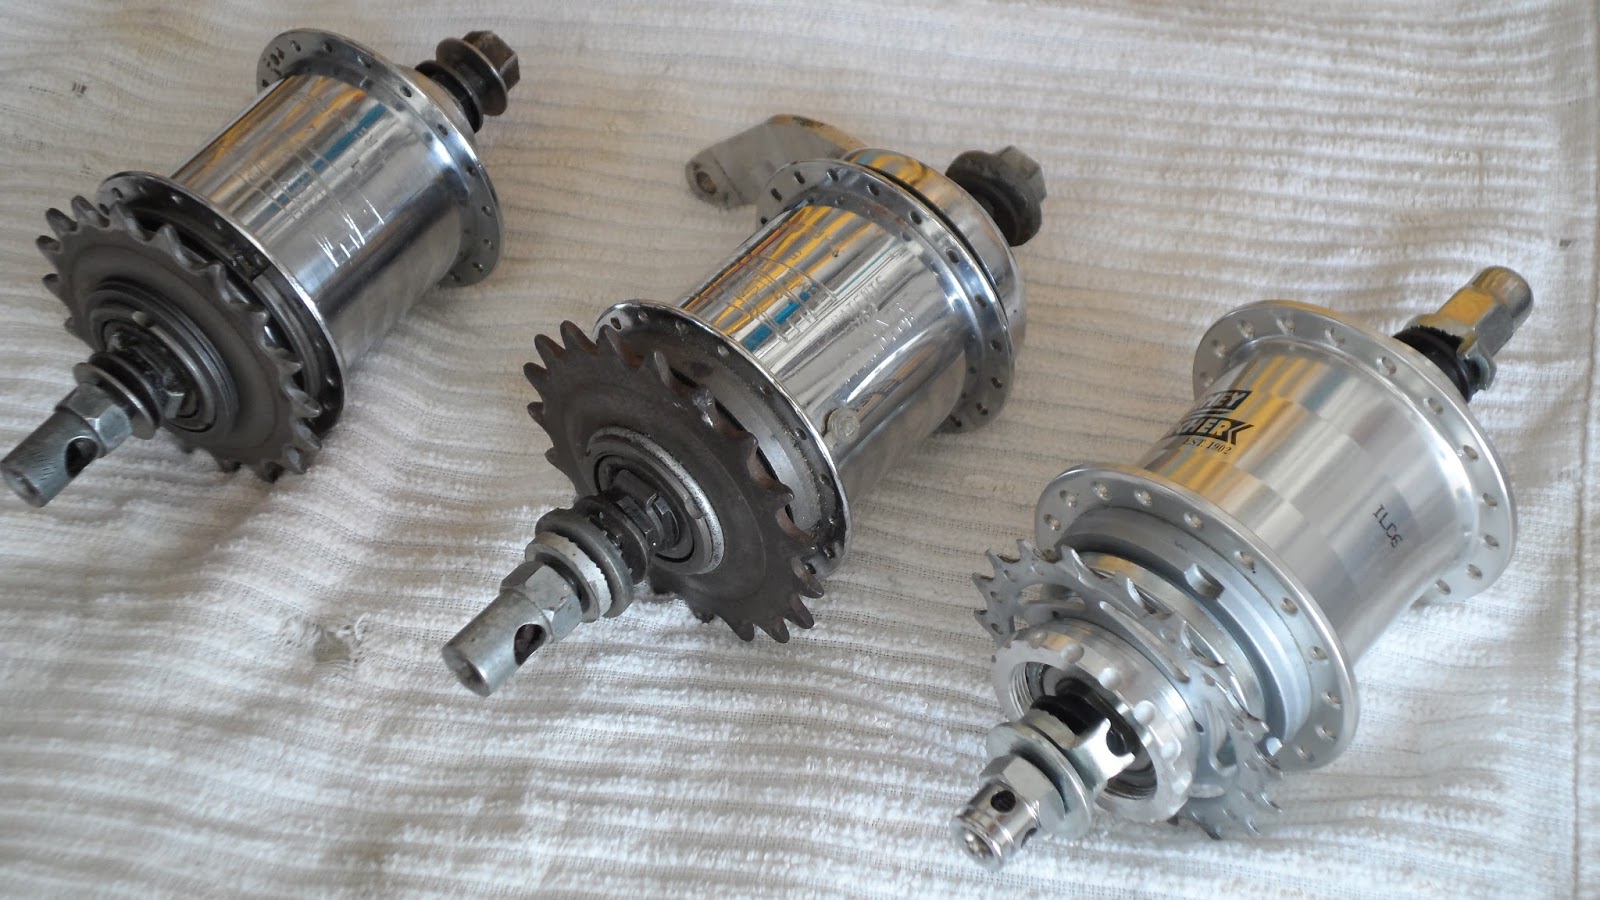
I have two projects going this year. One is the ongoing Schwinn Racer 3 speed I'm building up for an around-town bike. I finally got around to building up the new alloy wheels. When I had the old wheels disassembled, I realized I now have 3 different types if Sturmey Archer 3 speed hubs!
From left to right, the standard AW, a coaster brake 3 speed, and a fixed gear 3 speed!
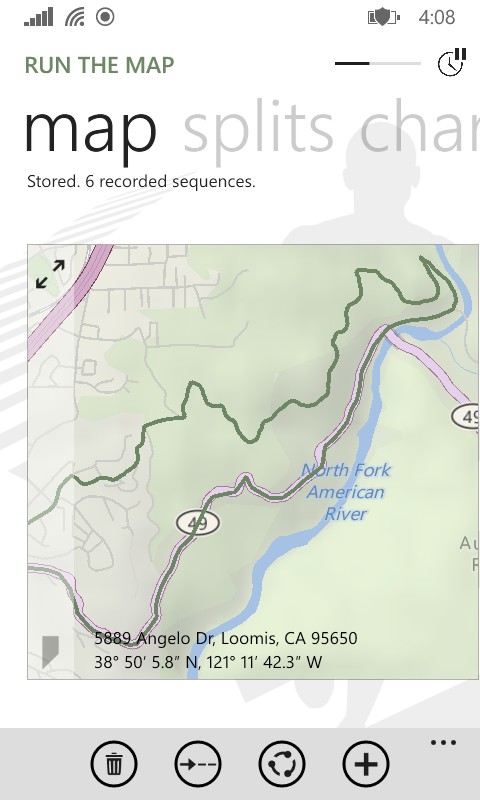
I found a source of fairly inexpensive spokes, Danscomp.com, and got the stainless steel spokes I needed for 25 cents a spoke, (nipple included!). I used ExCel based Spocalc to compute the spoke length, but from experience, I deducted about 2mm from the program's recommended length. These were laced up to the SA hub and the Sun CR18 rims, (which are in the 650A, or 26 X 1 3/8 size). The wheel went together easily, (thanks Jobst Brandt!), and now my Schwinn has nice, light, straight wheels!

The Racer with it's new wheels!
The other project just popped up. I was browsing E-Bay, (always a potentially expensive habit), and I came across 2 frames that looked interesting. One was a really clean Trek, the other a very old Nishiki). Both were auctions so I decided to go with a bid. I wasn't going to spend more than $100, (plus shipping), so that was my top bid for the Trek, and it was the highest at the time.

The Nishiki looked a little forlorn, but I've been wanting similar to an old International to replace my Performance Ascent fixie, so I went with the starting $75 bid.

Well, my high bid for the Trek held out until literally the last minute when it got knocked out by two other bids. My Nishiki bid however, remained the only bid and I won the auction!

It took about a week for the frame to arrive. It was well boxed and I was surprised by the condition of the 40 year old bike. There was some rust on the bottom of the chainstays where a kickstand had resided. The chrome on the fork had some surface oxidation which came out with steel wool and solvent and Simichrome. Most of the paint still shined up well. The decals were in decent condition which is saying something for an old Nishiki. It appeared that the bike hadn't been ridden a lot.

Looking pretty good after initial cleanup!
But there was a significant problem. When I fitted the rear wheel, I found that the rear dropouts were only 108mm's apart! And with the wheel in the frame, it was definitely canted a little. I ran a string from one rear dropout around the headtube, and to the other dropout. It showed that the left hand stays of the rear triangle had been shifted over to the right by a centimeter! This could be the reason the bike hadn't been ridden a lot!!

Oh boy, we have a little problem here! Rear spacing should be 120mm!
Fortunately, this is a steel frame, so there is a way to fix it! I referred to Sheldon Brown's excellent page to learn how:   sheldonbrown.com/frame-setting

Here's the set up for cold setting the rear triangle. I eventually had to double up the 1X4 for more stiffness. Use a 2X4.
The frame straightened out just fine, and everything looks good now.

One idiosyncrasy of the early Nishiki's turns out to be the size of the stem diameter. They actually use a stem quill of 0.833 inch, the result of a failed attempt to reach a size standard in the early 70s. This size was shared by a few other manufacturers, notably Schwinn. Old Schwinn Le Tours have this size stem. I'm lucky I happened to have a pretty nice SR stem, a 90mm, that is that size.

Another problem came up when installing the headset. I was using a nice Shimano Ultegra I had laying around. The problem was with the fork crown race. This bike's race was the old JIS 27.0mm diameter, of course a good headset like the Ultegra has a race of 26.4mm! Now, in the past, you could take your fork to most any bike shop and they would mill the race for you. Now, alas, that is not the case. Both shops in Auburn couldn't do it! I finally solved this problem by simply slicing the thin Ultegra race, allowing it to expand to fit the Nishiki fork crown. (You can get away with this method if your headset uses cartridge type bearings). Still, kind of sad to think two "PRO" shops can't handle this kind of job! (By the way, don't even try to find a 3 speed part at these places either! Why do they think we all use the web for shopping now?)

Well, after all that, I stripped the Ascent and assembled the Nishiki into a complete bike. A short test ride showed that my frame straightening was successful, the bike tracked straight and handled well. I still have to set up the rear brake. The Tektro 538's have enough reach for the front wheel, but fall a bit short in the rear. I think I found a solution: AICAN-Aluminum-Brake shoe holder

Got the brake shoes in about 8 days, not bad for postal service from China. They are nicely finished little bits of aluminum, for sure. Here are some shots:

Here's a side-by-side comparison with the original brake shoe holder.
Here you can see you gain about a half an inch in reach.
Here's a view of the brake installed. Note that I still have room in the slot!
The Nishiki after it's first real test ride.
I've now had the opportunity to take several rides up to  20+ miles and am happy with this bike's handling. With the longer wheelbase and relaxed geometry, it's definitely more stable than the Ascent. Some would prefer the stiffer and twitchier Performance bike, but I like the more stable handling and shock absorbing ride of this steel frame. I find it more pleasant on level and downhill fixed gear riding, while climbing performance may be slightly less than on the Ascent, it is more than adequate for my use.