Sunday, December 18, 2011

Bikes in Germany and Austria

German Postal Bike
Just getting around to showing some of the bikes I saw when we went to Germany last year. This Deutsche Post bike is a true workhorse. It's really built to last, even has wire guards for the tail light! This one's got a full load, which I'm sure is typical. A nice little touch is the flap which covers the seat when parked, keeping the saddle dry during the frequent showers here! 

The most common bike I observed in Munich had a mountain bike frame, fenders, and a bottle type generator attached to the left seatstay with a brazed on bracket. I believe there is a law in Germany mandating lights on bicycles, thus even the most common bike has this wonderful feature. 

A real working bike.
There were a lot of utilitarian, work bikes around. The postal bike is a good example. Here is another; very similar to the old Schwinn "Cycle truck" of the 1940s, I believe Workman Bicycles also manufactures a similar bicycle to this day. 26 inch wheel in back and a 20 inch in front. Note the brakes on this one, drum in front and a coaster in back! That front rack looks like it could carry a hundred pounds! This bike even had the advertisement hung in between the twin top-bars. Finally, notice the stout front stand used to keep both the work bike and the postal bike upright. Super stable, and spring loaded, you just have to push forward and the stand pulls up, out of the way. The bikes in the background are utterly typical of the average citizen's bike in town.

I did a little motorcycle spotting while in Salzburg and Munich as well. There were a fair number of V-Stroms around, I was surprised how many 1000cc models were there, here's one:
 Seen in Salzburg
Also in Salzburg I saw the beautiful Honda Transalp. Looking a lot like a V-Strom:
Honda Transalp.
One very nice looking bike, lot's of nice stuff on it, but probably costing 50% more than a V-Strom. Still, it would be nice to see these in the States. Sadly they have not been offered in over 25 years!

Single Speed mania is also rife in Munich! I couldn't tell if this was a fixed gear or freewheel, but with no toe clips, let's hope it had a freewheel!

Tuesday, October 11, 2011

Converting a Tiagra rear road hub to 135mm spacing.

Here's the difference between road hubs and mountain hubs.

As I related in my updates on my LHT page, I wanted to convert a road hub to mountain bike hub spacing. So what follows are a few notes about the process.

First; My reason for needing to perform this modification is purely aesthetic.Today's mountain hubs are chunky, black ugly things. Unfortunately, road hubs are starting to look that way too. I wanted to use the older style 105 hubs, but they aren't available and the current model looks fat, like a Mountain hub. At least it's not black. But since I had to go with that look anyway, I decided to go one level down and get a Tiagra hub for about half the cost. For the axle and spacer, I cannibalized the parts from a broken lower-end Shimano MTB hub.

Tiagra hub is below the old mountain hub.

Converting the Tiagra Road hub simply entails expanding the locknut-to-locknut spacing from 130mm to 135mm. You need a longer axle and 5mm of spacers. Fortunately, the old MTB hub's axle was in fine condition. It was straight and the threads were in good shape. So I figured I could use that. It also had a spacer which would work out fine for my purposes.

So, first step is to remove the axle from the old and the new hubs.No problems here, just loosen the locknut off the left (non-drive side) then pull it out of the hub. Be careful not to drop any of the loose bearings. The cups and locknuts of the Tiagra fit the old hub's axle fine. (I naturally wanted to use these as they were virtually pristine.) Below is a shot of the two axles:

The original axle and the longer MTB axle.

Now it's simply a matter of assembling the Tiagra's cones and spacers on the old axle, then inserting them into the Tiagra hub. But remember you have to add 5mm of additional spacer on the non-drive,(left) side in order to properly center the flanges and take full advantage of the wider spacing.

Putting the pieces back together.
This is a good time to glop some extra grease onto the bearings as well, although I am happy to report that the Tiagra's bearings were well lubed from the factory, but you can never have enough grease on those guys!
That's pretty much it. I then laced us the hubs to some polished Sun CR-18's and installed them on my LHT. These are so much more quiet than the Nashbar hub. 

Now that I have removed the axle from the mtn hub, I decided to strip off anything else that might be useful. Well, there's not much actually, but I might have need of the cassette body someday so I took that off. This is the first time I've removed one of these from a Shimano hub. Turns out to be quite easy: With the axle removed, take an 8mm Allen wrench and tug hard. The threads are conventional; righty tighty, lefty loosey.

Removing the Freehub mechanism.
You're unscrewing this large hollow bolt which holds the cassette body in place. After you've loosened it, (it'll be on pretty tight), you just pull it out:

With the bolt removed, the cassette pulls off easily.

Off it comes!
I'll hold onto this, it's a steel body which is supposed to be a little sturdier than alloy bodies, albeit somewhat heavier.

Sunday, August 21, 2011

My ride up to Grass Valley 7/10/2011

On Camp Far West Road

July is the time of year for one of my long rides. The one I always try to do takes me from Loomis, west through Lincoln, up Dowd Rd. to Sheridan, to Camp Far West, up to Grass Valley, then down Dog Bar to Placer Hills, through Meadow Vista and Auburn, then back to Loomis. It's usually an 8-9 hour ride for me. If it's not a hundred miles, then it's darned close

I always try to make this ride around my birthday every year. This gives me time to condition myself for it. This year, I did a lot of hill work early in the Spring, (for Mt. Shasta), so I felt pretty good early on. I decided to do this ride a little early this year. The weather was good, as usual, this year. Even more importantly, the temperatures were running a cooler than normal. 

The ride through Lincoln and Sheridan were uneventful. I made it to Camp Far West fairly early. Camp Far West Road, (CFWR) is pretty gnarly. At the campground turnoff, the road pitches incredibly steeply, and the road surface becomes very rough. After two very steep, short hills, the pavement ends, the next few miles are gravel.
 One of the better stretches this year!

This year, the condition of CFWR was not so great. There was a fair amount of washboard. I came near bouncing off the road one time. In other words, a typical ride on CFWR!
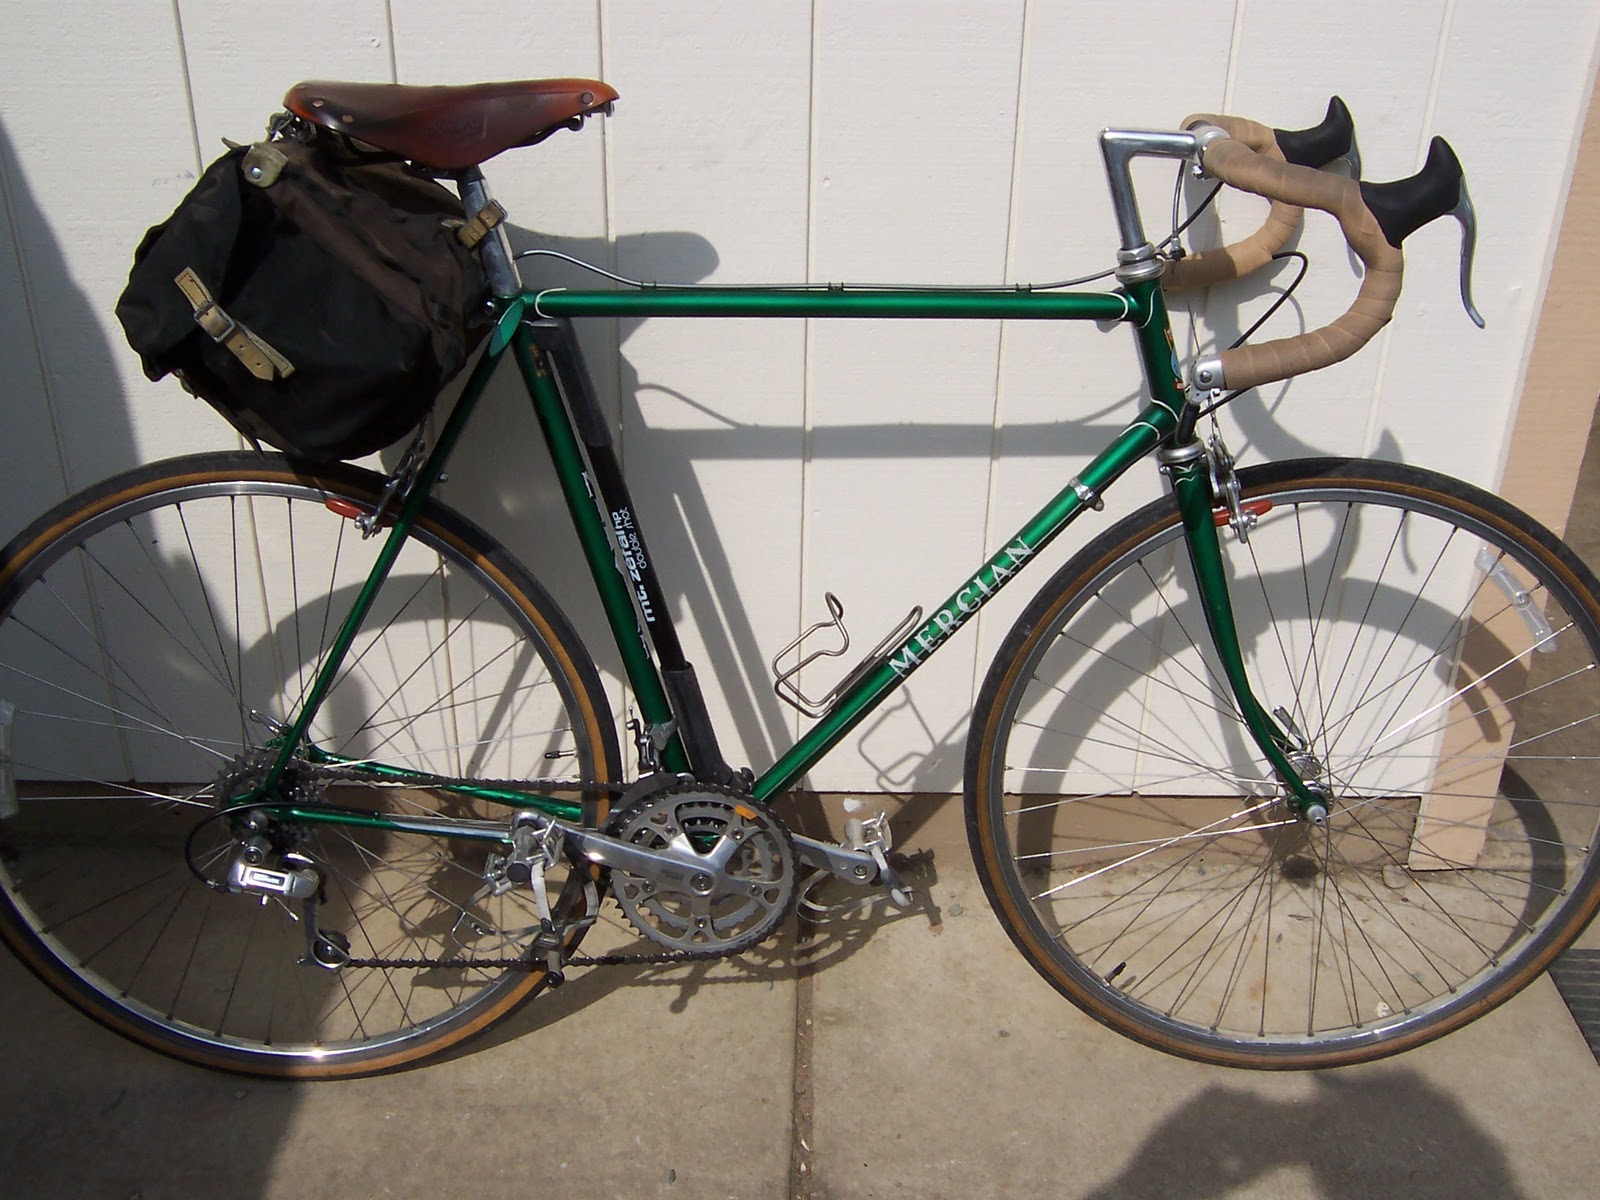
 The Surly on CFWR.
As you can see, I took the Pacer this year. It handled the rough stuff just fine. You will notice that I've only mounted one bottle cage. There were three reasons for this:

1.) Every year I have, or nearly have, lost the bottle from the seat tube cage on this ride. I needed to secure that bottle better.
2.) By the time I get to a second bottle on a hot day, the water in said bottle is luke warm to hot! Not very refreshing.
3.) I wanted to mount the Zefal pump vertically. Mounting it horizontally under the top tube always results in maddening rattling as the pump bounces off the top tube.

I had been considering these things recently, then started to think about some notes written by Jobst Brandt a while back, about one of his cycling trips through the Sierra Nevada. He had described how he stuck a can of soda in his saddlebag and enjoyed a cool drink after a long stretch. I also noticed that his bike never had multiple water bottles on it, just the one on the down tube. (These are the kinds of things I think about on long rides I guess!)

Anyway...I decide to use a small saddlebag, my Carradice Junior for this ride. This is probably one of Carradice's least know bags. It was the very first on I bought because it was the cheapest! Into the bag went my tool kit, a few snacks, camera, and my warm ups as I shed them. Inside also was my second water bottle.

This method worked brilliantly! By the time I got to the second bottle, it was still cool and fresh. I resupplied at Grass Valley and  refilled both with cold water. Also, that pump was wonderfully silent the entire trip!

Okay, back to the ride. CFWR comes to a road junction with Woody Road. Here I turn left. At the junction is this sign for the Spenceville Wildlife Area. I've got to say though, I've never seen an overabundance of wildlife here, outside a couple of deer and squirrels.

 At the Junction of CFWR and Woody Road.

Woody Bridge, looking south, (The bike is turned around to lean on the rail, I'm riding north.)

That bridge is always a hoot to ride over with skinny tires. Past the bridge, you go over a few rollers, still graveled with ample washboard.  Soon you hear gunfire, and you know you're almost at the end of the dirt! There is a small firing range to the right, I think it's probably set up for folks from nearby Beale AFB. Looks popular, almost always someone there.

Back on pavement!

You return to the pavement at the corner of Woody and Chuck Yeager Road, (which leads to the northeast gate of Beale, if you go left). I'm going right, eventually to Highway 20. Highway 20 has actually improved mightily over the last few years as a viable bicycle route. It used to be quite narrow and heavily traveled. It's still busy, of course, but there are more lanes and broad shoulders now. Not bad at all, except for the climbing part. It's still a long grind to Grass Valley.

But I made it there in fine condition. Last year, I already started to cramp coming into Grass Valley, this year, no problems! In fact, this year I suffered from no cramping at all! It was wonderful. I attribute it to two factors: the hill training I already mentioned, and, this is probably the real factor, very mild temperatures. I started very early, about 6:00 am this year, and the afternoon temperatures probably didn't go over 90 this year. (Grass Valley's high was a reported 85!).

 On Dog Bar Road

I was in Grass Valley by 11 o'clock. I stopped at the Raley's and got a bunch of food and drink. Mostly drink. Just a few snacks and some Cliff Bars for the road. I didn't stay long and was soon on Dog Bar Road, heading south now. This is a great road, very rural, but also hot and dry and hilly! You eventually drop down to cross the Bear River, then a steep climb back up the other side, then a short drop to Placer Hills Road. 


Following Placer hills road, through Meadow Vista, Clipper Gap and Christian Valley eventually to Auburn, you are challenged by a series of short but intense little climbs. this sign is posted at the top of one of the last ones, just before Bell Road!

I pushed through Auburn and rolled back into Loomis by 2:00 pm. eight hours, which is about normal for me, but, like I said earlier, without any cramps!! They didn't start until I was home resting in bed. YEOW!!

Pretty view from Auburn.

Saturday, May 28, 2011

Surly LHT Update May 2011

My LHT showing off its new components.

You know, aimlessly reading through the internet can be an expensive hobby. You find things that you didn't know existed and don't need, and then you start researching the stuff and then you find a really good price...well, to make a long story short, I found a great deal on Tektro CR720 cantilevers on Amazon, so I got 'em. Now, mind you, I had some decent brakes before, Shimano STX's. Nice looking units, but they were they are the mountain bike style "compact" brakes, which reduce the leverage of the arms a little. 

Anyway, the Tektro's are the old-school style with the longer arms that stretch straight out. They can be a leg clearance problem if you have a short wheel base bike, and they may get in the way of panniers, but neither of those two issues are a concern for me.

 Front canti installed!

They went on about as easy as a cantilever can. I still had a little trouble centering them. The cut rate discounter ships only the components, no packaging or even instructions, but you can easily install these without them. You can download them, but there are no great secrets. Just google them.

 Rear brake installed. Note the D/C "roller yoke".

AN UNPLEASANT SUPRISE

As I began installing the rear Tektro, I found the wheel was out of true. I was testing the spoke tension and found that 2 were completely loose. They weren't broken! The hub flange had!


The old Shimano hub had finally given up the ghost.  I guess I can't complain, I got over 10 years of hard service out of it! I had to come up with a replacement. I came up with a Nashbar sealed hub I had lying around. It was lying around because I don't have a huge amount of confidence in it. When I first bought it, about 10 years ago, the first one I bought broke a pawl spring after a few hundred miles! This was the replacement, which I never installed.
"New" Nashbar hub.
I rebuilt the wheel, but I retained the Shimano quick release. This is a road hub, so its spacing is only 130mm, not perfect for my Surly's 135mm, but it'll do for now.

So...after rebuilding the rear wheel, I was able to install the rear brake. No problems here. On both the front and rear, I chose to use the old Dia Comps "roller yokes". The Tektro's are pretty neat looking, but I had trouble centering the front brake with it, so I used the old ones. The Dia Compes are pretty neat anyway. My riding buddy, Todd, had them lying around and I think they're cool.

Thought I'd share a couple of other update to my LHT that were not in my original post about it. I originally built this bike with Shimano 8 spd bar end shifters, and used them for several years with no problems. Twice in the last couple of years. though, the bolt holding them together loosened and I lost the indexing alignment. Had to reassemble them to get them working properly. I was starting to long for the simplicity of down tube shifters. I like the clean look of a bike without all those wires hanging off the handlebars! So I took 'em off and stuck on a pair of Rivendell "Silver" shifters. 


Silver down tube shifters.

 I think they work fine, and look great. The final change was the pedals. I've decided to give Nashbar one more try; I got their "Gavia" SPD pedals on sale.


 Nashbar Gavia SPDs

Not bad, a little trickier to get into than the mountain bike pedals I usually use. We'll see how they hold up!

So, here's an overall view of my LHT as of May, 2011:

Did I mention the VO aluminum fenders? Nice huh?

Cheers everybody!

5/30/2011 - Thought I'd add a few comments after I put a few miles on these new components...so far so good. I found the new Tektro's to be wonderful brakes! Even with the original pads on them, I found their grip very good, and they were absolutely silent! Very happy with them

The rebuilt wheel held up fine, no hub failure yet! It's one loud freehub though, the ratchet clicks are quite loud in the garage...but I don't really notice it on the road.

7/23/2011 - Update; I'm starting to notice something weird  going on in that rear Nashbar hub. Twice I've had the chain seem to jump off the cogs...I think the hub might be starting to go, the same problem I had with the original hub!! I just ordered a Tiagra from Universal Cycles, I think I'll try to swap the axle and spacer from the broken hub to the Tiagra, in order to have a 135mm width again. I'll post the mod here when it happens!

8/24/2011 - Maybe the Nashbar hub is not the culprit here. I was getting a lot on noise in my drivetrain lately, so I took a good long look at the chain and sprockets. The chain was beat, I can't remember how old it was! The chainwheel teeth were very worn and some were starting to hook. and the rear cassette's smaller sprockets didn't look too hot either. I removed all of that and replaced the chainwheel with a less worn one, plus I installed a virtually new cassette and chain I had lying around. The result is a much quieter drivetrain and no slipping gears, (yet!). So, I'll run this for a while and see how it goes. Meanwhile, I've got a Tiagra hub on the workbench, converted to 135mm. I'm going to get some new rims and spokes and build a new wheelset for the LHT soon.

Monday, May 16, 2011

Tour of California comes to Wheatland!!

The peleton swoops through downtown Wheatland.

Today is day 2 of the Amgen Tour of California. Day 1 was pretty much wiped out by the unseasonable snows in the Sierra yesterday. Even today, the original start in Squaw Valley was scrubbed for a midday start in Nevada City.

The stage route took the race through Wheatland on its way to Sacramento. I thought I'd ride out and see if I could get a glimpse of the race. I left the house at a little after noon, (about the same time the race was starting in Nevada City!). The weather was still kind of lousy, windy and cool but at least it wasn't raining. That wind probably allowed me to make it to Wheatland just in the nick of time. I pulled up to the cordoned off Rio Oso road literally 5 minutes before the group arrived!

The leading motorcycle.

I had no sooner leaned my bike against a nearby wall when the peleton came through. It was quite a site, what with the CHP, motorcycles, helicopter, etc, etc. Quite a show, for about 5 minutes!


After this excitement, I had to head back home. That wind which had helped get me to town in time, now was  a strong headwind, so I had a long slog home.


Sunday, May 15, 2011

My Surly Years

A few years back, while surfing the web considering a replacement for my Mercian Audax, which I had sold due to sizing issues, I came across references about these bikes being designed in the States and TIG welded in China. The company, Surly was a quirky little outfit that made a few interesting bikes, all in steel!

They first created the "1X1", a single speed mountain bike, then the Steamroller, a single speed street bike. They now have a whole line of really unusual and imaginative bike designs. The first to grab my attention was an honest-to-god touring frame for 400 bucks! The Long Haul Trucker. It was also in a lovely, (to me anyway), shade of sage green. I ordered a big one, (60cm)so I wouldn't get stuck with too small a frame.
Long Haul Trucker
Compared to the bikes of the 70s and early 80s, the LHT has some remarkable features. Double eyelets for rack and fenders, 3 sets of water bottle braze-ons, low rider eyelets, completely set up for cantilever brakes, threading in the bottom bracket bridge for bolting on the fender, even spoke holders on the left chainstay! The bikes geometry is excellent for touring, plenty of clearance for fenders and for a stable ride. I really couldn't think of much more they could have put on this bike. Maybe a bracket for a bottle generator(dynamo), like I saw on practically every bicycle in Germany last year! Only thing I would change, the spoke holders were not really useful for my length of spokes. I've never been able to use them.  Also, it would have been cool to have them on the chain side, that way, if you could fit spokes into them, they would make a chain guard for the stay as well!
Initial set up of my LHT. Stem height and length would eventually change.

For what it is intended for, the LHT is a remarkable bargain. I've used it on several tours through the Northern Sierra, and its been a comfortable and reliable machine. 

On the Sunrise Highway, San Diego County, just north of Mt. Laguna.

At the summit of Monitor Pass. Fall, 2008. This shot shows my current
configuration of stem length and height.

Well, I guess you can figure out where this is. Fall, 2008.

*  *  *
For my next bike project, I needed a purpose built commuter. I had been commuting with a fixed gear for several years, so I looked at what was available in single speed bikes. There were beginning to be a lot of choices available in this field sine single speeds were becoming very fashionable. Out of several candidates I finally decided on the Surly for a couple of reasons: one, I was happy with the quality of my LHT, and two, I got a really good deal on this from Universal Cycles. I can't really remember the price now but it was pretty reasonable, less then even the LHT. Of course, there less stuff on a SS, so it should be cheaper I guess.


Posted by PicasaSurly Steamroller Commuter
Anyway, when the frame showed up, it was missing a fork! But the guys at Universal were very good about taking care of that little mistake. Well, I'm not going to gush over the Steamroller too much. It's a very simple bike, really no frills at all. But the geometry is nice, it was a nice riding bicycle. The one downside on this bike was the placement of the water bottle bosses. If you're going to go through the bother of installing them, why put the only ones on the bike on the seat tube as opposed to the down tube? I don't get it, if you use a frame pump, either you have to strap a bottle on the down tube, or you go without a bottle. I even wrote Surly about this but they are sticking with that design. I think it just make the bosses useless! Eventually, the lack of eyelets for fenders also became a hassle.

After about 2 1/2 years of riding, I started to notice a bit of flex in the frame. A close examination uncovers a large crack had developed at the weld and down tube near the bottom bracket! I suppose this was just a fluke, not a normal problem with TIG frames, I hope so, anyway. Surly and Universal bikes were very good about backing their warranty, they gave me a generous credit, for which I am grateful. 

I guess my overall impressions of the Steamroller are mixed. If it's just about the ride, no problems. But since I wanted a few more features for my commuting bike, it fell a little short.

*  *  *
My next Surly proved to be a real sleeper. I was checking out the Universal Cycles webpage one day and came across a clearance sale, they were blowing out Pacer frames for something like $250!!
Pacer
It so happened that I was thinking about a somewhat sportier ride than my LHT, so what the heck! In a week I had a nice shiny frameset in the garage, and started to assemble parts for it. Mostly I used stuff I had from previous bikes. I did some research and discovered the perfect brakeset for this bike is the Campagnolo Centaur. Their reach is just a bit longer than Shimano shorties, they are reasonably priced, plus it was a chance to get some new Campy stuff! I also got some of the Tektro "Ergo" rip-off levers, Shimano 105 derailleurs, and some 7 spd indexed levers which you can force into 8 spd mode.


Near Lake Cuyamaca, San Diego County
I have to say, that while this bike is not the most exciting, it has become a favorite ride for me. Riding position is as good as it gets for me. It has all the right features for this type of bike. I'm even beginning to like the idea of black bikes!

Outside Mt. Laguna.

Look familiar? Same place as the LHT picture a few years earlier.

Sunday, April 3, 2011

1982/83 Colnago Specialissimo

1982/83 Colnago after refurbishing by Joe Bell and co.

In the late summer of 1983, I got a real job, working for the U.S. Army as a civilian weather observer at Dugway Proving Grounds, in the western Utah Desert. Shelly, my future wife, came out to be with me, and in the winter, she gave the go-ahead for me to buy a nice bike before our wedding in the Spring. I found a very quaint little shop in Centerville, (north of Salt Lake City), that I wanted to give my business. The shop had a very nice Fuji Opus on display, and I actually put a deposit on it. But after some thought, decided I should take this one time opportunity and buy European. I still had my Mercian, and had already owned a Peugeot, so I decided I wanted Italian. So the shop owner was happy to look around for a good deal on an Italian frame. He found a nice blue Colnago Specialissimo for me, so we made the deal. I got the headset, bottom bracket and seatpost, (Campagnolo of course), ordered at the same time. Shelly ordered the rest of the components I needed from mail order and they all arrived in time for what was probably the best Christmas presents I ever got!. All Campy Nouvo Record, with a Super Record rear derailleur. It was a thrill just to look at the boxes!

In Winnemucca, in the mid 80s. Original paint with some hand done details,
(head and seat tube painted by me).

When I moved to Winnemucca, my road bike riding was somewhat curtailed by the number of available roads. This wasn't a bike you could slap fat tires on. In fact, it was a chore to install the rear wheel with a 28C tire!! 28 is my favorite road tire size. It gives a comfortable ride yet still offers a nice lively feel. 28C tires are also easier to patch, since the standard REMA patch will fit nicely on the tube. With thinner tubes, you have to fold the patch around the fold of the tube when it's laid flat, making it difficult to stick. So a 28C tire is a must for me. To make the tires fit easier, I finally had to file off a bit of the lower "jaw" of the rear dropout. That helped but didn't completely solve the problem.

Anyway, I rode all around WMC with my Colnago. My favorite pastime was to ride up Winnemucca Mountain on the old road up to the radio tower, then come back down for a high speed descent! Really fun. My annual century consisted of riding down I-80 25 miles east, then back and the 25 miles west! It could get really boring.

The road riding was better in Great Falls, MT. When I moved up there in the late 80s, I found a bunch of interesting rides. My favorite summer ride was out to around Holter Dam and back.

Coming back to California in 1994, I still had the Colnago, but was tired of it's small size and other limitations. I finally replaced it with a used Eddy Merckx, (7/11 edition!), and later with my Mercian Audax. I tried the Colnago as a fixed gear for a while but finally, needing to make room in the garage, I finally put it on EBay. 


Sunday, March 20, 2011

Road Bikes: 1982 Mercian Olympic


"1983" Mercian Olympic

My Mercian is the oldest bike in my stable. I purchased the frame set new at La Mesa Cyclery back in 1983. The serial stamped to the bottom bracket revealed that this is an '82, not an '81 as I had originally believed.

The model is "Olympic", and it was a pretty modest frame for those days; a 531, lugged steel frame with fairly simple braze-ons. The one feature that really sets it apart was the lovely paint. A beautiful shade of metallic green with white lining along the lugs. Really pretty.

Set up for touring, note the Mafac "Racer" Brakes.

The one down side was that the frame was designed for 27 inch wheels, and it doesn't always work with what are now called "long reach" brakes, (57mm), and 700c wheels. Over the years I've experimented with various brakes and found that Mafac Racers worked quite well, except for the fact that they're Mafac Racers! I had a lot of squeal from those guys. I finally solved the problem by converting the bike to a fixed gear and eliminating the rear brake! (the front brake reach was never a problem).

Me and my Mercian on a ride from San Diego to Phoenix, 1982!

This bike has seen many different formats over the years. At first it was a touring bike with a triple crank (and a Campy Rally rear derailleur!) It became my only road bike,( with a double crank), when I left California for work through the mid 80s. It was somewhat neglected in the late 80s before becoming my commuting bike in Montana and then Sacramento in the late 80s to early 90s. I returned it to touring bike style for a couple of years and now, it is a fixed gear single speed.

The Mercian as a fixed gear road bike.

 The riding position on this bike is so comfortable, that the Mercian ergonomics have become the standard for all my other bikes. The fit of this bike is very nice for me, I feel comfortable on it instantly. I adjust all my other bikes to approximate my riding position on this one. Even then, there is something that sets this bike apart. It just feels right.


Here's a link to my latest rebuild of this bike:
http://georgebike.blogspot.com/2012/05/mercian-olympic-redux.html