Sunday, January 13, 2013

Surly Pacer 650B conversion

At Auburn State Recreational Area


Surly Pacer with 650B wheels.

650B wheels are a size between 26 inch and 700c. They used to be popular in France many years ago with cyclotourists and utility bikes. More recently, Grant Petersen of Rivendell revived interest in this size and has produced several 650B bikes. Jan Heine of Compass Bike has also helped drive interest in this tire size.

One popular result of this interest has been the conversion of 700C bikes to the 650B wheel. This allows the rider to mount larger width tires, resulting in a bike that is a bit more comfortable and versatile and can be used on rougher dirt roads.

It turns out that the Surly Pacer, already one of my favorite bikes, is a very good candidate for 650B conversions. The clearances are just about perfect for a relatively easy conversion. Basically, all that you need are the wheels and associated tires, tubes and rim strips, and a very long reach brakeset. Fortunately, all of this is now readily available and pretty affordable.

For brakes, you will need something with a reach in the range of 70mm. Tektro now makes several models, including the 556 and 559. These are both very nice looking and well made. I chose the 559's, making sure I got the recessed allen nut type. I found some on eBay for $45 shipped! 

Tektro 559's installed; lots of room!

As you can see from the picture, these brakes have ample reach, and there's lots of room for adding fenders, (which I hope to do eventually). Installation was straightforward, the only change I had to make was to shorten the cable housing about 1cm, the Tektro's needed a little bit more cable than the Campy Centaurs.

Next, of course, you'll need some 650B wheels. I wanted this experiment to be very cheap, so I searched on the web and found a wheelset for $65 on Amazon. Tires, tubes and rim strips were all ordered. The tires I chose were the Panaracer Col de la Vie, about $21 each. 

The wheels are certainly nothing special, Weinman rims (ZAC19?), with a bottom of the line Shimano freehub and some unknown up front, but this is more or less a trial, so I don't really care if they last forever. Everything went together, but the Col de la Vie's do not want to seat evenly, they have a slight hop from a couple of low spots. It's not really very noticeable when riding though, so I'll let that slide for now.

Update-I found a solution to the tire seating problem. Something I learned from mounting a motorcycle tire; I sprayed "Endust" furniture cleaner/polish between the tire sidewall and the inside wall of the rim. Then I pumped the tires up to about 80 lb's. pressure. That did the trick, now the Col de la Vie's seat well on these rims!

 Rear brake install. Note that there's still some reach left on these 73mm reach brakes!

A look at the front brake, again, plenty of reach left over!

A head-on shot of the front fork install. Note the clearance of the 38C tires.

The photo above shows the one limiting factor of the stock Pacer in fitting a wide range of 650B tires. The 38C Col de la Vies fit fine, but you would be hard pressed to fit anything much bigger. I have seen conversions which have replaced the front forks with some of additional clearance. Personally, I think 38C is wide enough for my uses of this bike. I'd be shopping for a Mountain Bike if I wanted anything bigger, anyway.

 Plenty of room in the back though!

Finally, with the work completed, it was time to ride! I took it over the hill to Lincoln and was pleasantly surprised by the feel. With 75 lbs in the tires, they felt responsive and fast! The bike tracked and cornered well. It almost seemed like I was riding at one gear lower than usual. I wonder if this was a result of the smaller diameter tires?


 After it's maiden flight!

All in all, I found this a worthwhile project. Total cost was about $170. I think it really expands the possibilities of the Surly Pacer. I anticipate adding some nice metal fenders and probably upgrading the entire wheel set. Adding a dynamo hub and lighting, this would make a very nice and economical randonneuring bike.

Saturday, November 10, 2012

Carradice vs. Zimbale saddlebag comparison

Carradice Pendle on the left, and the Zimbale 11 ltr bag right.

While at this year's North American Hand-built Bike Show, I spotted a vendor displaying English-style saddlebags!  These turned out to be Zimbale bags, imported from Korea. I had seen them on line before, I think Harris Cycles sells them. click here for Harris Cyclery's Zimbale page

At any rate, they seemed like nice looking bags, made of heavy cotton duck material. After looking around and chatting with the (very nice) people there, I discovered that they were selling some factory seconds at 50% off!  Well, of course I was hooked at that moment. The largest bag available for that deal was the 11 liter, it looked fairly big to me, I was hoping it would be the same size as my Carradice Nelson, my commuting bag.

The problems that caused these bags to be discounted were minor; Mainly, the screws fixing the bag to the wooden dowel were installed wrong, just missing the leather reinforcement underneath. It was a simple repair to relocate the screw.

Relocated the screw slightly to the left.

Another problem was that the wooden dowel used for support seemed too short to me. I picked up a short length of 5/8 inch hardwood dowel from ACE Hardware, just a couple of bucks. I cut it so the ends reached close to the corners, as in the Carradice.

 
Close up of the replaced dowel.

So for a little of my time, I got a $100 bag for $53! I think it's a pretty nice looking bag;

Zimbale 11 liter
Comparing it to my Carradice bags, I found that the 11 liter is just about exactly the same size as my Carradice Pendle, a bag I've owned for several years now. It, (the Pendle), has been a terrific bag, so I thought it might be fun to compare these two.
 Carradice Pendle

When comparing the two bags, the first thing you notice is that the Zimbale seems to have a lot more going on.  Notice the 2 sets of D-rings, really useful for external loading, like hanging a wet rain jacket. There are also 2 other plastic D-rings which would allow you to attach a shoulder strap for off-bike duty. Very neat, although I don't like plastic, wish they would have gone with metal there too. In contrast, the Pendle seems rather plain, albeit solid looking. Also, no plastic to see there at all!

Another nice feature in the Zimbale is the "long flap" which allows you to extend to top flap to accommodate a large load. This is a feature you find in Carradice's larger bags, the Nelson and Camper. Nice to see it here, although, to be honest, I've never needed it.
Long flap! Closed here...
Long flap open!
The shots above also illustrate the Zimbale's D-rings. Finally, one other unique feature for the Zimbale: a sort of quick release for the flap.
"Quick release" buckle.
The quick release allows you to open the bag with out messing with the buckle. Nice idea, although I wonder how well this feature would wear over time.

Up to this point, you would not be blamed for thinking, well so long Carradice! This bags got it all over you! But not so fast...there are some strengths in the Carradice bag that stand out. Also, some of the bling of the Zimbale seems only skin deep. The best example of this, I think, are the humble buckles!
Carradice buckle, simple, but carefully engineered and wonderfully effective.

Compare the two buckles above. The Zimbale certainly looks nice, but look closely. The buckle has no roller. It's just a very basic buckle. The Carradice buckle is a simple steel device but that roller is very important, it makes operation much smoother and relieves a lot of stress on the strap. finally, notice the thickness of the leather straps, Zimbale's are paper thin.

This is generally the advantage that the Carradice bag holds: quality where it counts. These bags are the results of many generations of English cycling experience. They are simple, and they are built to last.

Another example of this is found in the quality of the leather. After only a couple of months of use the straps holding the Zimbale to my B-17 show severe wear:

This shot doesn't show it well, but that strap is just about ready to let go! I installed zip ties to support the bag, otherwise they would have broken in half! To be fair, Carradice has brown leather straps that are also very thin, but at least they lasted a couple of years on my Nelson! The white Carradice straps are the way to go, they're very thick and last for years. i wonder what it is about non-white leather that makes them so skinny?

To sum up, these are both above average bags. They seem to be fairly close in price too. It would be a difficult choice to make. The Pendle is a very tough and reliable bag, you can use it out of the box with no change for years of service. The Zimbale offers some very nice features, especially the provision for outside storage of gear which the Pendle doesn't have. Some of Zimbale's materials are not up to the same standard or Carradice, but you can replace some of those easily.

Well, it's nice to have the choice!

Finally, here's some shots of what under the flap!

Inside the Zimbale bag. Notice the clip and strap which can draw the opening up.

Inside the Pendle: very basic. Both bags feature a nylon skirt w/drawstring.

Wednesday, September 5, 2012

Mercian on order!!


 This was my Audax which I have sold. However, my KOM will be the same color so it's somewhat relevant!
Update - 02/27/2013 - Initial assembly
Update - 02/13/2013 - The frame has arrived! Link to pictures of the new frame!

Update - 02/05/2013 - Just got the tracking information, the frame is now on it's way!

Update - 01/19/2013; Got a call from Mercian this morning, (@ 5:30 am, that's an improvement)! The frame is completed and will be shipped next Monday, (01/21/2013)!! Right on schedule per Grant's estimate.

Well, I recently turned 56, it is the minimum retirement age for my job. I can now retire with full benefits!

Of course, I'm not quite ready to go, I've been enjoying the work and the pay is terrific right now, especially with my youngest now graduated and no heavy debts, Shelly and I will try to enjoy a couple of more years of good income and little debt. I'll probably go in a couple of years.

Anyway, I felt I should observe this date with a special treat, a pre-retirement retirement gift if you will. I decided a nice bicycle frame would do the trick. After looking around a while, I decided to order another Mercian (This will be number 3!)

Mercian really offers a good product, almost custom, with wonderful paint for a reasonable price. I thought I'd try to describe the process one can order a Mercian.

First, you need to go to the Mercian webpage ;http://www.merciancycles.co.uk/

Their frames page describes all their different models. I was looking for a touring/randonneuring style, so I went with the King of Mercia, (KOM), touring. You can also get the KOM in a racing model and a "Sportive" model.

The "Online Frame Builder", http://www.merciancycles.co.uk/frames/57/frame-builder , is a great feature which allows you to design your frame and color scheme. What fun! I spent lot's of time visiting this site and creating my bike in many different patterns.

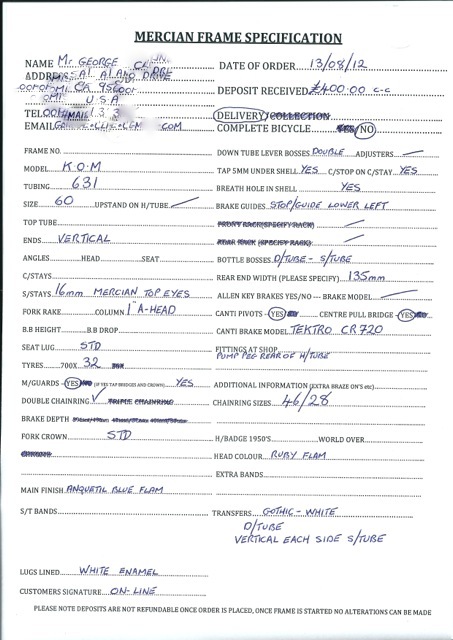
After my birthday, I decided it was time to pull the trigger, good thing too, because as I was getting set to order, Mercian mentioned they planned a price increase soon, so I took the plunge, hit the "order" button and waited to see what happened. Well not much at first, after about a week I sent an email inquiring if they got my order. I got a reply quickly after that, and Grant from Mercian said that they would give me a "bell" to get the deposit. The bell came at 2:00 am. one morning! I guess they forgot I was in California. No biggie, we got everything done and soon they sent me a scan of the credit card slip. Next, a few more emails were exchanged with Grant to clarify my specs. Soon, the spec sheet was emailed to me along with a general arrangement drawing illustrating the frame's geometry.

Spec sheet!

Looking through the specs, you will see that I went with cantilever brakes; until I tried the Tektro CR720'son my Surly LHT, I would never have considered canti's, but the Tektro's  have changed my mind. Also note,I'm going with Anquetil Blue Flamboyant again, it's a great color. It will have a flamboyant Ruby head tube for contrast, with white lining.


General Arrangement.

Grant says there is currently a 5 month turnaround on frames, so I should be seeing it arrive sometime around January! I'm glad I ordered this frame when I did, because the price increase became effective September 1st, and it was a big one! The base price for a KOM went from 615 pound to 750!! Yikes! Stay tuned for updates!

Saturday, May 19, 2012

Mercian Olympic redux.

My latest rebuild of my Mercian.

My Mercian Olympic had been hanging in the garage for some time, unused because I had to move the fixed gear drivetrain that I had on it to Gordon's Nishiki so he could have a fixed gear bike for school. I decided to go back to a multi-geared configuration using as much of my old Campagnolo Nuovo Record equipment as I cared to. I put it that way because I feel there are a few features of the old NR stuff that I don't want to use anymore. Mainly the 42-52 chainwheels and the old record headset. I also had some pretty nice 5-speed Japanese wheels with cartridge bearings on hand so I didn't go with the Record hubs, maybe I'll build some new wheels up with them, as I do have a large and small flange set. I did find that the rear SunCR18 was dented and there were several damaged spokes on the rear wheel, so I had to replace that rim and the spokes. For tires I installed brand new Pasela TG's 28c's.

Note the huge clearance for the rear brake. This bike was happier with 27 inch wheels.

One issue I've had with the Mercian is the wheel clearances. The rear N.R. brake won't reach a 700c rim without modification. You could use a drop bolt, if you could find one and afford it. It's not a huge amount of space you have to make up. I finally found a way to make it work. I simply filed the bolt hole in the brake bridge, forming something of a slot, just by removing a few millimeters, I got the reach I needed, and the mod is invisible. No work was required on the front brake, a 700 fits fine there.

 The Nuovo Record Rear Derailleur
The drive train was pretty straight forward. I have a lightly used NR RD, front D, and a grab bag of NR shifter parts.  I added a Sun Tour freewheel with 14-26 cogs. 26 is close to the N.R.'s max capacity. I wanted the advantages of a compact crankset, so I used my old Deore MTB with a 110 BCD. It has a 34 and a 46 tooth chainwheel combo.
A look at the front end.
I installed the classic N.R. brake levels and used fresh brake and derailleur cables and taped up the bars. For now I'm using the MKS touring pedals, but I may overhaul my Campy's and use them someday.

It certainly makes a nice looking bike. It rides very well, almost like a racing bike. I plan to use it more often this summer.

Finally, here's a 1981 catalogue page courtesy of the Mercian web page, showing the very model of my bike!

 My 1982 Mercian, as of May, 2012!


Sunday, March 4, 2012

2012 North American Handmade Bicycle Show; Update with more pictures!

Della Santa Track bike

The 2012 NAHBS was held at the Sacramento Convention Center this year, so I dropped by to check it out.

When we entered the show, our attention was immediately drawn to a Randonneur sitting to our right.

 Cyfac Rando
Detail of the Cyfac.
 
A "Cyfac", apparently made in France, never heard of the type before. A nice way to start off the show.   There were many Rando style bike displayed, I was very happy to see the builders going this way. Lot of fenders and longer wheel bases and even down tube shifters!!

Six-Eleven Tourer
Canti brakes hammered fenders and everything!
A seat tube shifter!!

 Interesting reproduction of an old motor paced track design. Look at that gear!
A Victoria Cycles Rando

 Cielo, very nice. Matching fenders!
This picture does not do the finish on this bike justice, it was very eye catching in person!
Even though it's a TIG weld job, a very nice set-up on this Speedhound. Those Tektro brake levers were on a lot of bikes and they felt great.

 The Speedhound's "hook": interchangeable dropouts!

Henry James was there, showing off his fine lug work.

 There were a couple of different wooden bikes displayed. Me, I don't get it, but they are fun to look at.

A bamboo bike is actually a hybrid of steel and wood. Uh, what size front derailleur clamp does that take?

Details: A Steve Rex. Nice way of mounting the pump. Also, look at the brazed on Paul Race centerpull brakes.  I saw several bikes with that set up at the show.

One of many work bikes - Porteur style racks, etc. Several examples of this style bike were at the show. I'm not sure how many people would be willing to spend the cost of a custom made frame for a work bike, though. Sure are nice to look at though.

Another. This one has the belt drive and an internally geared hub.

Great show, lots of wonderful bikes to look at. If you ever have a chance to catch one of these shows, do it!!


Saturday, February 18, 2012

Sanyo Dynohub Install, pt2, tailight!

Busch and Muller Securlite

After the initial installation of the Sanyo dynohub and Lumotech headlight, I began planning the addition of  a dynamo driven taillight. Because, well just because.

I ordered the Securlite tailight and an extra 185 cm of wiring from Longleaf, and I was pretty amzed at how fast I got the stuff in the mail. It was like 4 days. I had ordered an extra 185 cm of wire with the taillight, when I opened the box, I found that the light comes with 210 cm of wire. I thought I probably didn't need  the extra length. But as things turned out, it was a good thing that I did.

I spent a long time thinking and planning how I was going to run the wire. I first thought about having the wire follow the rear brake cable stops along the top tube, then snake it down a seat stay to the rear brake bridge and the under the fender to the taillight. I finally decided against this for two reasons: One, the wire would be exposed at the top tube, probably easily snagged and it was not a very clean look. Also, running wire down the stay would not look great either.

I decided to run the wire inside the down tube, by drilling one hole up near the head tube, and another in the bottom bracket. That's not as crazy as it sounds, since I've had several bike which had opening in the BB shell.
Slightly fuzzy picture of the first hole in the upper down tube.

Gee, drilling through the down tube was easy! A little unnerving I guess. I had to enlarge and refine this hole to a slightly oval shape. Drilling a hole in the BB was a little trickier, but it worked out okay. It happens that the BB I'm using, (a Shimano UN72) will allow plenty of room for the wires to fit inside the BB shell. I've heard reports that other BB's don't allow that much room so be warned if you try this at home. You might want to put the exit hole in the bottom down tube rather than the BB shell.

Another fuzzy shot, but you can see the hole in the BB shell.

After having these two holes prepared, I then had to fish the wire through the down tube. It was tricky to do, not as tricky as the fork blades, but I still had to work at it to make it through. I then brought the wire through tp the chainstays and began planning my next wire run. At this point it was obvious that the supplied 215 cm of wire was not going to make the run I wanted. It was a good thing I ordered that extra wire!

I decided to run the wire from the BB to the bottom of the rear fender, then along the inside of the fender to the light. It was probably the cleanest path I could come up with. I wanted as little wire showing as possible.

Here's a shot of the spliced section of wire.

Wire running up the inside of the rear fender, eventually to the taillight.

I fixed the wire to the inside of the fender using metal tape I had left over from a storage shed assembly. This stuff is amazing. It sticks well and is very strong. I have a lot of confidence in this installation...even though it looks like crap! It's inside the fender, so nobody will ever know.

Completed installation. I've wrapped the wire with electrical tape to protect it from the edges of the hole.


Rear view of completed installation.

So that was the installation. I was pretty satisfied with the overall look, with very little wire exposed. Actually getting the light to work was a bit of a challenge for me. At first it ran all the time the front wheel turned! I had wired it so it apparently bypassed the on/off switch. I tried several wiring schemes, even emailed Anthony at Longleaf about it. He had not heard of the problem before. Well, I pulled all the wires from the headlight and re-installed them and this time they worked! the proper combination ended up being this:

(Looking at the back of the headlight, left to right): taillight lead, black/white left terminal, then solid black taillight lead  on the right terminal, Dynamo lead, black/white left terminal, solid black on the  right terminal. 
This ended up giving me the proper ability to switch both head light and taillight with the switch on the head light!