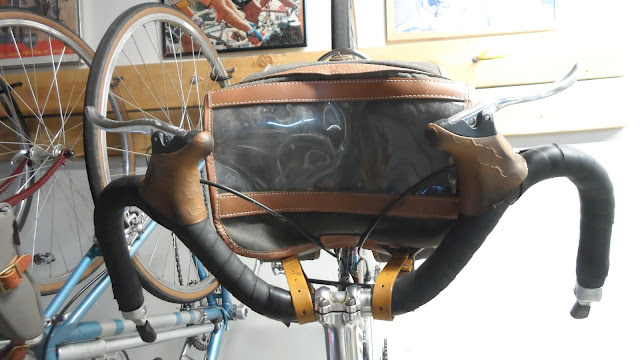
Moustache Handlebars came about in the 1990's, thanks to Grant Petersen's spec for the Nitto made bars on the fabled Bridgestone XO-1. Immediately, they were a flashpoint of controversy. Some loved them, many hated them. Over the years different iterations of them have appeared. The set I originally bought were from Bike Nashbar and made of chrome-moly steel, a little heavy, but well shaped. I tried them on a mountain bike but something didn't gel so I threw them into the parts bin where they languished for several years.
A few years ago, the old 3TTT handlebars I had on my King of Mercia Tourer snapped in two. While pondering their replacement, I remembered my old moustache bars and decided to give them a try. Now something clicked and I immediately liked the bars. After a couple of tweaks in the bars' angle and position of the brake levers, I was hooked. I used these bars on my High Sierra Tour which included Tioga and Sonora Passes and included one day which was close to 120 miles! I felt pretty good even after those long days. After that trip, I switched from downtube shifters to bar cons.
 |
| Here's the moustache bars on my Mercian. |
I've been riding with moustache bars on my King of Mercia tourer for several years now, riding some fairly long distances with them and I've been very happy with them. A lot of people don't like them, reporting problems with hand comfort, something I've never experienced. The people reporting these negative reactions are experienced riders whose opinions I respect, but my experience just doesn't square with theirs. In this post, I'm going to illustrate my moustache bar setup and relay some of my experiences.
One of the more common complaints I've heard about moustache bars is a lack of hand positions available. However, I've found I have at least three hand positions available, more if you count small variations of the three. Drop bars typically offer four, the drops, the ramps, the brake hoods hoods and the flats near the stem. Not that great of difference.
Here are my basic Moustache hand positions:
1. Hands on the brake hoods. This position can afford you an almost aerodynamic tuck position. If you wrap your fingers around the hoods, it is a useful position for climbing up to moderate grades. By varying my fingers grip on the hood I can have several slightly different hand positions to alleviate any pressure points that might develop.
 |
| Position #1 with fingers wrapped around the hoods for a comfortable resting position. This is also a nice position for moderate climbing. |
 |
| A slight variation of position #1. |
Position #2. Hands on the "hooks". I like this position when I need stability. It gives you a nice solid feel for the bars and it is also your main braking position.
 |
| Position #2. A good, stable stance for anything technical like descending a rough road or trail. |
 |
| Position #2 is also your primary braking position, although I have applied brakes from position #1, when you need some serious braking power, #2 is the way to go. |
3. Hands on the bar ends. This is your hand position for shifting, (assuming you're using barcons, which I highly recommend for a moustache bar equipped bike) and for intense climbing. It's nice to have the leverage when horsing the bike up a steep grade.
 |
| Position #3, for shifting with barcons and for hard climbing. |
I spend most of my time in positions #1 and #2, frequently shifting my hands from one spot to another. That's something I also do with drop bars. Position #1 is nice when climbing short, moderate hills, gripping the brake hoods for leverage. Sometimes, when on flat roads, I'll just rest my hands on the brake hoods. Position #2 I'll use for technical riding, such as down steep or rough descents. It's also my braking position.
Mentioning the bar end shifters reminds me that initially I had downtube shifters on my KOM when I converted to the M-bars. I actually used them for quite some time before finally switching to bar ends. I have to say that bar end shifters are really the way to go with moustache bars. It's just so easy and natural to shift using them.
Let's look at my handlebar set up. When I was using drop bars on my KOM, I used a 110mm stem. With the moustache bars, I switched to a 90mm. It turns out that I also actually lowered the bars just a tad, which goes a little against the conventional wisdom of moustache bar fitting, most people advise raising them! But generally, moustache bars already put you in a higher position so I found setting the bars just a smidge below saddle level to be comfortable.
 |
| KOM with drops. Notice that the drops put your hands below the level of the top tube. |
I've found a distinct downward slant to be comfortable. It affords a comfortable angle for my hands on the outside position and also gets the brake hoods up to provide support.
There are two issues concerning the brake lever position that I diverged from Bridgestone's recommendations, (per the 1993 catalogue). The catalogue recommended spacing the tips of the levers about 12-13 cm apart, and to keep them horizontal. My brake levers are 17 to 19 cm apart and are canted slightly upward. These both have resulted in a more comfortable, natural hand position for me. 12cm apart seems very close and would put the levers at an hard to reach angle. Incidentally, I have found that aero style brake levers have worked fine on the moustache bars with my Tektro CR720 cantilever brakes.
 |
| The Ritchey Ascent with moustache bars. |
 |
| In Yosemite. |

.jpg)
No comments:
Post a Comment