Thursday, October 5, 2023

Riding the Mt. Laguna Loop in 2023!


At the desert overlook near Mt. Laguna

It's been several years since I've had the opportunity to ride in San Diego County. This year, at last, we decided to pay a visit to our old stomping grounds and I had a chance to take a ride. The ride I chose is probably my favorite of all the rides down there; a loop starting near Descanso, going through Cuyamaca State Park and Lake Cuyamaca, up to Mt. Laguna then down through Pine Valley and Guatay and then returning to Descanso. Total distance is just a hair over 50 miles.

Here's a plot of the ride.

The start is at the Highway 8 Park and Ride which is actually a couple of miles outside of Descanso. 

At the Park and Ride at the beginning of the ride.

It's fairly easy going at first. I have found the best route for this ride is to turn onto Highway 79 and head for Cuyamaca State Park and take the ride in "clockwise" direction. It's best to do the stretch to Lake Cuyamaca early before traffic becomes a problem. Traffic wasn't a big deal for me since I did this ride on a weekday, but anyone trying this route on a weekend will want to keep it in mind. Also, I rather enjoy the descent from Mt. Laguna to Pine Valley at the end of the ride!

Outside Descanso

Riding up Highway 79 will take you through Cuyamaca Sate Park. A very nice place which was badly damaged by a Cedar fire now many years ago! It'd nice to see nature slowly rebuilding across the area.


Entering the State Park on Highway 79.

One benefit(?) of that fire was that the trees and brush were cleared and you can get a good view of Stonewall Peak!

A nice view of Stonewall Peak from the road.

After a good little climb you arrive at Paso Pecacho Campground, which is across the road from the Stonewall Trailhead. The road levels out now and you even have a little descent to Lake Cuyamaca.

At Paso Picacho Campground.

At the lake I stopped and picked up a couple of snacks to supplement my peanut butter and jelly sandwich. Then I proceeded on past the lake and to County Road S1, the Sunrise Highway!

Lake Cuyamaca.

You have now entered the Anza-Borrego State Park. The start of the Sunrise Highway is level but quickly starts to climb. There is quite a bit of climbing from here on until you reach Mt. Laguna. At one point, the Pacific Crest Trail crosses the highway!


On the Sunrise Highway, (County Road S1), you encounter the Pacific Crest Trail!

After a while you come to the Mt. Laguna Recreation Area! Still more climbing to go, however!

Continuing up the Sunrise Highway.

Eventually you will come to a vista point which overlooks the Anza-Borrego Desert. I have always made a point of stopping here and enjoying the view. I always snap a picture of the bike from this vantage point! This year was no exception. 

I take this picture every time I do this ride! Overlooking the Anza-Borrego Desert. Not far from Mt. Laguna now.

After a short break and a snack at the Vista Point, I continued on towards Mt. Laguna. By riding this ride in this direction, it is easy to spot the USAF Radar station on a peak off the road. When going the other direction, I never saw it!

The USAF radar station at Mt. Laguna.

Soon I was in the little village of Mt. Laguna. I stopped at the Visitor's Center which has restrooms and water available. I needed to refill my bottles here. Then I rode through the rest of town. There are a couple of places here where you can buy food and drinks if you need them.

After a short climb out of Mt. Laguna, I started the long descent down to Pine Valley. Conditions were ideal and you can make very good time dropping down this road. Thanks to it being a weekday, traffic was very light indeed.

At the bottom of the Sunrise Highway, getting close to Pine Valley now.

I just passed through Pine Valley, no stops this time but there are a few places where you can get food. I almost stopped for some ice cream but there were a few people in line in front of me so I decided to continue riding. 

From Pine Valley you head up a grade to Guatay, then it's a downhill run to the Highway 79 turnoff that you took to go to Lake Cuyamaca. Then up through the little stretch of cafes and markets and back to the Park and Ride. 

End of the ride photo of the Mercian at the Park and Ride.

This ride was a pleasure, as usual. Total distance is just over 50 miles and it took me almost exactly 5 hours. Not a real fast ride, mostly thanks to the 4,600 feet of climbing, I suppose. But the late September weather was really sublime and riding conditions excellent.

No equipment issues were encountered, not even a flat! My Mercian has triple crank on it but I used the middle ring, (36T), and outer, (44T) for almost the entire ride. I think I dropped into the granny ring once by accident but never really needed it. One odd thing I noticed from the pictures I took on this ride was that my saddle had tilted up a little more than usual. I think it may have slipped some time before this ride but I never noticed it. At any rate, it didn't feel odd at all but I did reduce the tilt a little when I got home!

If you find yourself in San Diego County someday, be sure to check this route out, it's great!

Monday, September 4, 2023

2023 ride to Iowa Hill.


At Iowa Hill.


It's hard to believe, but it's been SIX years since I've taken the ride up to Iowa Hill!   See: Iowa-Hill-Finning Mill and Yankee Jims.html  That seems incredible, but I can't find any record of my doing this ride since that time!

Back in 2017, I did this ride on my Felt V-100 with 700C X 42 tires. This time I rode the Ritchey with 650B X 48 tubeless tires. 


At the American River crossing on Iowa Hill Road.

I chose this day for the ride because temperatures were forecast to be a little below normal for August, still plenty warm but I hoped no too warm! Unfortunately, I got out rather late and didn't actually start riding until 11:00 am, something I'd pay for later!

The ride starts just outside of Colfax. The Park and Ride at the old Dingus McGee site is now cordoned off but you can park near the westbound 80 onramp. Then I followed Canyon Way up to Iowa Hill Road. There begins the steep drop to the North Fork of the American River. After crossing the river, you begin the very long, very steep climb. The first stretch is really tough but there are plenty of other bad stretches too! I've got some pretty small gears on the Ritchey, which is equipped with a triple crank, and I used them...a lot!

At long last I came to Iowa Hill. I stopped to snap a picture or two but I didn't really take a break there, instead, I continued on to Sugar Pine Reservoir.


Finally making it to Iowa Hill!


At Iowa Hill.

The ride from Iowa Hill to Sugar Pine still requires a little more climbing but it isn't nearly as hard as the road from the river to Iowa Hill.


At Sugar Pine Reservoir.

After passing the Sugar Pine boat ramp turnout and approaching the OHV staging area, I came to the cut-off at Finning Mill Road. This will take you directly to Foresthill Road and it is a pretty nice gravel road winding through some beautiful country.

On Finning Mill Road

Finning Mill takes you to Foresthill Road, just east of town actually. It's an easy ride into town.

Finning Mill Road at Foresthill Road.

Upon reaching Foresthill, I stopped at the very nice little community park on the North side of town. I refilled my water bottles and had a snack. It was pretty warm and I was beginning to feel some cramping in my legs so I rode over to a food mart and got a bottle of Gatorade to cool me off and to supplement to plain water. 

At the Foresthill community park.

After that short rest I got on Yankee Jims Road for the descent back down to the American River. I've done this ride many times and there was no surprises here. Actually, the road was in pretty good shape this year with minimal washboard and little traffic. I was happy to see water still coming down a couple of the falls along the road on my way down. Also, since this was the north facing side of the road, I enjoyed some shade on the way down.

Heading down Yankee Jims Road.

Along Yankee Jims Road.


The crystal clear water of the American River at the Yankee Jims Bridge.

Unfortunately, after crossing I was on the south facing side of the canyon and was exposed to the bright sun and intense afternoon heat. I took my time and slowly ground my way up to Colfax.

 
The post-ride photo of the Ritchey. A little dirty but no worse for wear!

Well, it was a successful ride in that I did actually complete it, LOL, but my time was terribly slow, over 5 hours and 45 minutes; an average of only 7.3 MPH!! Geez! A full hour slower than my 2015 ride over the same route. Not sure what slowed me down except perhaps, ahem, 8 years of aging!

Anyway, the bike performed well, with the big 48mm tires handling the gravel portions just fine. I was riding Gravel King slicks, but had little trouble with traction on these dry roads. The only slippage I noticed was when I would try to stand up on steep inclines. I quickly learned to sit back down and just spin the low gears made possible with my triple crank. I'm thinking maybe my relying on these low gears so much may have contributed to my slow pace. I don't know, but I didn't feel particularly tired after this ride, so the low gearing helped me there.

Here's a plot of the ride.

This ride is always something of an adventure for me, I'm so glad I did it this year, and I promised myself it wouldn't be another 6 years before I tried it again! 


Wednesday, July 26, 2023

Moustache bars and me.


Moustache Handlebars came about in the 1990's, thanks to Grant Petersen's spec for the Nitto made bars on the fabled Bridgestone XO-1. Immediately, they were a flashpoint of controversy. Some loved them, many hated them. Over the years different iterations of them have appeared. The set I originally bought were from Bike Nashbar and made of chrome-moly steel, a little heavy, but well shaped. I tried them on a mountain bike but something didn't gel so I threw them into the parts bin where they languished for several years. 

A few years ago, the old 3TTT handlebars I had on my King of Mercia Tourer snapped in two. While pondering their replacement, I remembered my old moustache bars and decided to give them a try. Now something clicked and I immediately liked the bars. After a couple of tweaks in the bars' angle and position of the brake levers, I was hooked. I used these bars on my High Sierra Tour  which included Tioga and Sonora Passes and included one day which was close to 120 miles! I felt pretty good even after those long days. After that trip, I switched from downtube shifters to bar cons.

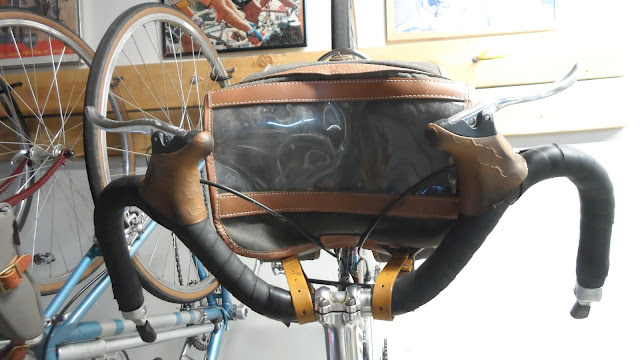
Here's the moustache bars on my Mercian.

I've been riding with moustache bars on my King of Mercia tourer for several years now, riding some fairly long distances with them and I've been very happy with them. A lot of people don't like them, reporting problems with hand comfort, something I've never experienced. The people reporting these negative reactions are experienced riders whose opinions I respect, but my experience just doesn't square with theirs. In this post, I'm going to illustrate my moustache bar setup and relay some of my experiences.

 One of the more common complaints I've heard about moustache bars is a lack of hand positions available. However, I've found I have at least three hand positions available, more if you count small variations of the three. Drop bars typically offer four, the drops, the ramps, the brake hoods hoods and the flats near the stem. Not that great of difference. 

Here are my basic Moustache hand positions:

1. Hands on the brake hoods. This position can afford you an almost aerodynamic tuck position. If you wrap your fingers around the hoods, it is a useful position for climbing up to moderate grades. By varying my fingers grip on the hood I can have several slightly different hand positions to alleviate any pressure points that might develop.

Position #1 with fingers wrapped around the hoods for a comfortable resting position. This is also a nice position for moderate climbing.

A slight variation of position #1. 

Position #2. Hands on the "hooks". I like this position when I need stability. It gives you a nice solid feel for the bars and it is also your main braking position.

Position #2. A good, stable stance for anything technical like descending a rough road or trail.

Position #2 is also your primary braking position, although I have applied brakes from position #1, when you need some serious braking power, #2 is the way to go.

3. Hands on the bar ends. This is your hand position for shifting, (assuming you're using barcons, which I highly recommend for a moustache bar equipped bike) and for intense climbing. It's nice to have the leverage when horsing the bike up a steep grade.

Position #3, for shifting with barcons and for hard climbing.

I spend most of my time in positions #1 and #2, frequently shifting my hands from one spot to another. That's something I also do with drop bars. Position #1 is nice when climbing short, moderate hills, gripping the brake hoods for leverage. Sometimes, when on flat roads, I'll just rest my hands on the brake hoods. Position #2 I'll use for technical riding, such as down steep or rough descents. It's also my braking position.

Mentioning the bar end shifters reminds me that initially I had downtube shifters on my KOM when I converted to the M-bars. I actually used them for quite some time before finally switching to bar ends. I have to say that bar end shifters are really the way to go with moustache bars. It's just so easy and natural to shift using them.

Let's look at my handlebar set up.  When I was using drop bars on my KOM, I used a 110mm stem. With the moustache bars, I switched to a 90mm. It turns out that I also actually lowered the bars just a tad, which goes a little against the conventional wisdom of moustache bar fitting, most people advise raising them! But generally, moustache bars already put you in a higher position so I found setting the bars just a smidge below saddle level to be comfortable.

KOM with drops. Notice that the drops put your hands below the level of the top tube.

KOM with Moustache bars. Your lowest hand position is level with the top tube. The raised the brake hoods bring your hands almost level to the saddle height. Also note the downward slant I've set with the bar ends. 

I've found a distinct downward slant to be comfortable. It affords a comfortable angle for my hands on the outside position and also gets the brake hoods up to provide support. 

There are two issues concerning the brake lever position that I diverged from Bridgestone's recommendations, (per the 1993 catalogue). The catalogue recommended spacing the tips of the levers about 12-13 cm apart, and to keep them horizontal. My brake levers are 17 to 19 cm apart and are canted slightly upward. These both have resulted in a more comfortable, natural hand position for me. 12cm apart seems very close and would put the levers at an hard to reach angle. Incidentally, I have found that aero style brake levers have worked fine on the moustache bars with my Tektro CR720 cantilever brakes.

So that's my take on moustache bars. I've thoroughly enjoyed them. So much so that when I picked up a Ritchey gravel bike, I chose them for it. I figure they are ideal for gravel and dirt when you want a good, solid grip on the bars!

The Ritchey Ascent with moustache bars.


In Yosemite.


Saturday, June 24, 2023

This year's century ride, 2023 edition.


Under the I-5 overpass at the Sacramento River.

In spite of a lackluster winter and early spring, I found my training mileage by mid-June to be good enough to entertain thoughts of attempting a century, (a 100 mile ride), by the third week of the month. We have been enjoying unseasonably cool temperatures in Northern California lately and that is helpful in going that distance.  In addition, a bunch of personal stuff is coming up in July so riding time will probably drop. Looking at my schedule and the weather forecast, I figured Tuesday, the 20th, would be optimal.

It turned out to be a good call. Although there was no cloud cover at all the temperatures were very mild, with the high eventually only reaching the 80's, rather incredible for this late in June! It was cool enough that I wore 3/4 length tights over my riding shorts! I also wore a wool short sleeve jersey and sun sleeves. 

The bike I chose for today's ride was my '80 Mercian Olympic. The 46/30 chainwheels ensured me a good range of lower gears and reasonable cruising high gears. I used my Rivendell/Carradice Handlebar bag to stow my food and gear.


Nice conditions heading out of Lincoln.

The ride turned out to e pretty uneventful. Passing through eastern Lincoln then taking Wise Road to N. Dowd then up to Riosa Road at Sheridan. From there I turned west, and followed Bear River Drive to Pleasant Grove Road. From Pleasant Grove you head west on Cornelius Ave. which will get you to East Nicolaus, then you follow Nicolaus Road to Nicolaus and on to the the Garden Highway


My annual visit to Nicolaus. Sadly, the Post Office has been closed and is up for sale.

Riding the Garden Highway levee road is always a high point of this ride for me. I enjoy riding along the picturesque Feather River and since I do these rides on weekdays traffic is seldom an issue. In fact, traffic was virtually non-existent on the ride this year.


Look closely at the center of this picture; that's the confluence of the Sacramento and Feather rivers!

The one bad thing about riding the Garden Highway in the past has been the terrible road surface around Verona.  Well, I'm overjoyed to report that this stretch of road has been resurfaced and is now as smooth as glass! What a treat it was to glide over that stretch of road!


The once horrible stretch of asphalt around Verona is now like glass!

I came to the county park located under the I-5 overpass to find it locked up! Fortunately I was able to walk in and use the porta potty and have a snack at the picnic tables. I don't know why it was chained off...

After the break at I-5, I continued on Garden Highway to the bike lane which leads to Discovery Park and got on the American River Bikeway. Shortly after that my phone died so I couldn't take any more photographs and my ride tracking app stopped! The ride along the bikeway was uneventful and at Beal's Point I got on Auburn-Folsom road, continuing up to King where I turned off for home in Loomis. My final mileage is an estimate, 105 miles.

Thanks to the mild temperatures I completed this ride feeling quite good! No cramping at all and none over the next night, which can happen to me at times. I'm sure the cool temperatures make all the difference in dealing with this distance. I also took a fair amount of food. A half a peanut butter and jelly sandwich, a couple of granola type bars and a small bag of red licorice, (I'd pop one of those into my mouth once every hour or so). I think the candy helped keep me energized.

Equipment wise, the old Mercian worked like a champ! No mechanical issues at all, not even a flat. I used the Panaracer Gravel King Slicks in 32mm. I think these tires are great for road riding. They feel good, corner well and are pretty resistant to flats.


A post ride photo of my Mercian. no issues at all today!

It was good to get the century finished before July. I hope to try to get another century this year, perhaps in the Fall. We'll see. 

Tuesday, March 14, 2023

Rainy day musings.


The Raleigh Pro finished! I've since re-routed the front brake cable to run behind the handlebars.

It's been a pretty wet Winter here in Northern California this year. That's a good thing since we've needed the water so badly, but it has put a real damper on my riding. My mileage this year has been really low. We've got several camping trips planned this year so it looks like this year's mileage isn't going to approach the 5,000 mile mark of the last few years!

I have been tinkering though and have got the '78 Raleigh Pro assembled now. I've only taken it out for a few short rides but I've been pretty impressed with it's "feel". Looking forward to the dry season when I can really take it out for some longer rides.


With the proper cable routing.

I've changed the brake levers on my '80 Mercian from Shimano to my older Tektro levers with the integrated quick release on the lever. This will allow a little more clearance when removing and installing wider, (32mm) tires. It had been a problem squeezing the 32mm Gravel King through the brake pads before, also I like the feel of these levers. I took the opportunity to install new handlebar wrap at the same time. While it was on the rack, I found some fenders lying around and installed them, too. 

New levers and tape, plus fenders installed!

With so few chances to ride so far, I haven't had a lot of memorable rides to report. Just a few local loops. 

Here, I posed my bike against the rock which had fallen onto Taylor Road during one of our many storms! It had come to rest in the middle of the road just before the railroad overpass at Newcastle. Crews had moved it to this place on the roadside.

Took a short ride to Rattlesnake Bar to see if the water had reached the ramp yet. Not Quite!

Well, I hope to put in some more interesting rides as soon as the weather cooperates! Maybe i'll get a actual bike tour in later on.

Saturday, February 4, 2023

My 2022 rides and bikes.

Rest stop during my Three Rivers Century Ride.

2022 was another year where I managed to ride a little over 5,000 miles! The total mileage was 5.090 and it was the fourth year in a row that I broke the 5,000 mile mark. This was despite completing only one century, see 2022 Edition of my Three Rivers Ride. 

Approaching the bridge on McCourtney Road east of Camp Far West.

I also did my 100 KM gravel ride, see Riding around Camp Far West.  Most of my rides were from 20 to 40 miles this year. I was careful not to stress my knees, using a 44 tooth chainring on two of my Mercian KOM tourer and my Ritchey gravel bike as well as on my SS fixed gear. I really don't miss the higher gears on the top end.

My fixed gear Mercian Olympic.

I discovered that fixed gear riding with the slightly lower gear was actually a little more fun especially on downhill runs I found that I could control the speed a little more easily. That's something I wouldn't have guessed would result from a lower gear on a fixie! Also, the new chainring I installed was a "Narrow/Wide" style designed for 1X drivetrains. It seems to work great on a fixed gear drivetrain and seems very quiet compared to the old chainring, but that may have been due to wear on the old one.

Pelago rack on the Ritchey.


My newest bag, a Tourbon!

I finally found a nice font rack to fit on the Ritchey, a Pelago (Finnish) brand aluminum rack. It took a little finessing to make the top metal strap fit but after that, it worked well. I mounted that huge Ostrich F-106 handlebar bag on it but I have since replaced it with a newer bag, a Tourbon from eBay. Time will tell if it is a good one, but it seems to have a lot of nice features so I'm hopeful!


My Winter project: a 1978 Raleigh Pro!

The biggest project of the year was the late year acquisition of a very nice 1978 Raleigh Professional frameset off of eBay. I'd been wanting something to hang all of my old Campy Nouvo Record components on for some time and this one came up. I had been watching it for a while when suddenly the seller dropped the price to a very attractive point so I snapped it up. All in all it is in very good shape for being some 45 years old! Really not a spec of rust. One odd problem was a small bulge in the steering tube. The only way I figure this could have happened would be by clamping down on a Cinelli stem binder bolt very, very hard! Since I planned to use a Nitto Technomic with it's wedge shape binder, I figure this wouldn't be a problem and it looks like I'm right, as the Nitto stem fits just fine.

I had planned to use 100% Campy stuff on this bike but my Record headset turned out to be too badly brinelled to use. I picked up an FSA Duron cartridge bearing headset. It's a very good headset and it looks the part.

Project completed!

So I was able to complete the build fairly cheaply, although I did splurge for some Campy brake cable guides and a seat binder bolt. The wheels are sort of place holders for the moment until I can lace up my Campy hubs, By the way, I installed 26mm Panaracer Gravel king slicks on the bike because I wasn't sure if 28's would fit and I found the 26's at a good price. They fit fine and I think 28's will too so that's what I'll most likely go with in the future, but we'll see, the 26's feel fast!

The Raleigh will most definitely be a fair weather bike. The old Campagnolo drivetrain means you have to be imaginative to get low gearing. In this case, I have a 14-28 rear freewheel cluster. in order to make the Nouvo Record rear derailleur handle that, I've reduce the difference in the front chainrings considerably. I am running 42/46 chainrings up there and all is well. Still, this won't be my first choice in climbing any Sierra passes!

I've only taken the bike out for a couple of short rides, but I have enjoyed them! It reminded me of the old days of riding fast bikes! It handles very well, cornering nicely yet it's pretty stable, no-hand riding is a breeze on this bike! I'm looking forward to taking out on longer rides when the weather dries out.

Looking forward to next year, I don't think I'll manage another 5,000 mile year. We are planning a camping trip up to Alaska with our travel trailer so that will take a big chunk of time out of my prime riding season. I do hope to get some sort of bike camping trip in so we will see.

Equipment wise, it should be a quiet year indeed, I only anticipate building a set of wheels for the Raleigh. Other than that, it will be just regular maintenance and repair. 


From March, 2022