Sunday, February 14, 2016

Winter projects.

Circa 1974 Nishiki International
Winter's always a good time to spend in the workshop and this year is no exception. Except for the recent spate of nice weather which allowed some good riding, (I managed to get a ride around Folsom Lake in!), I've had plenty of time to work.

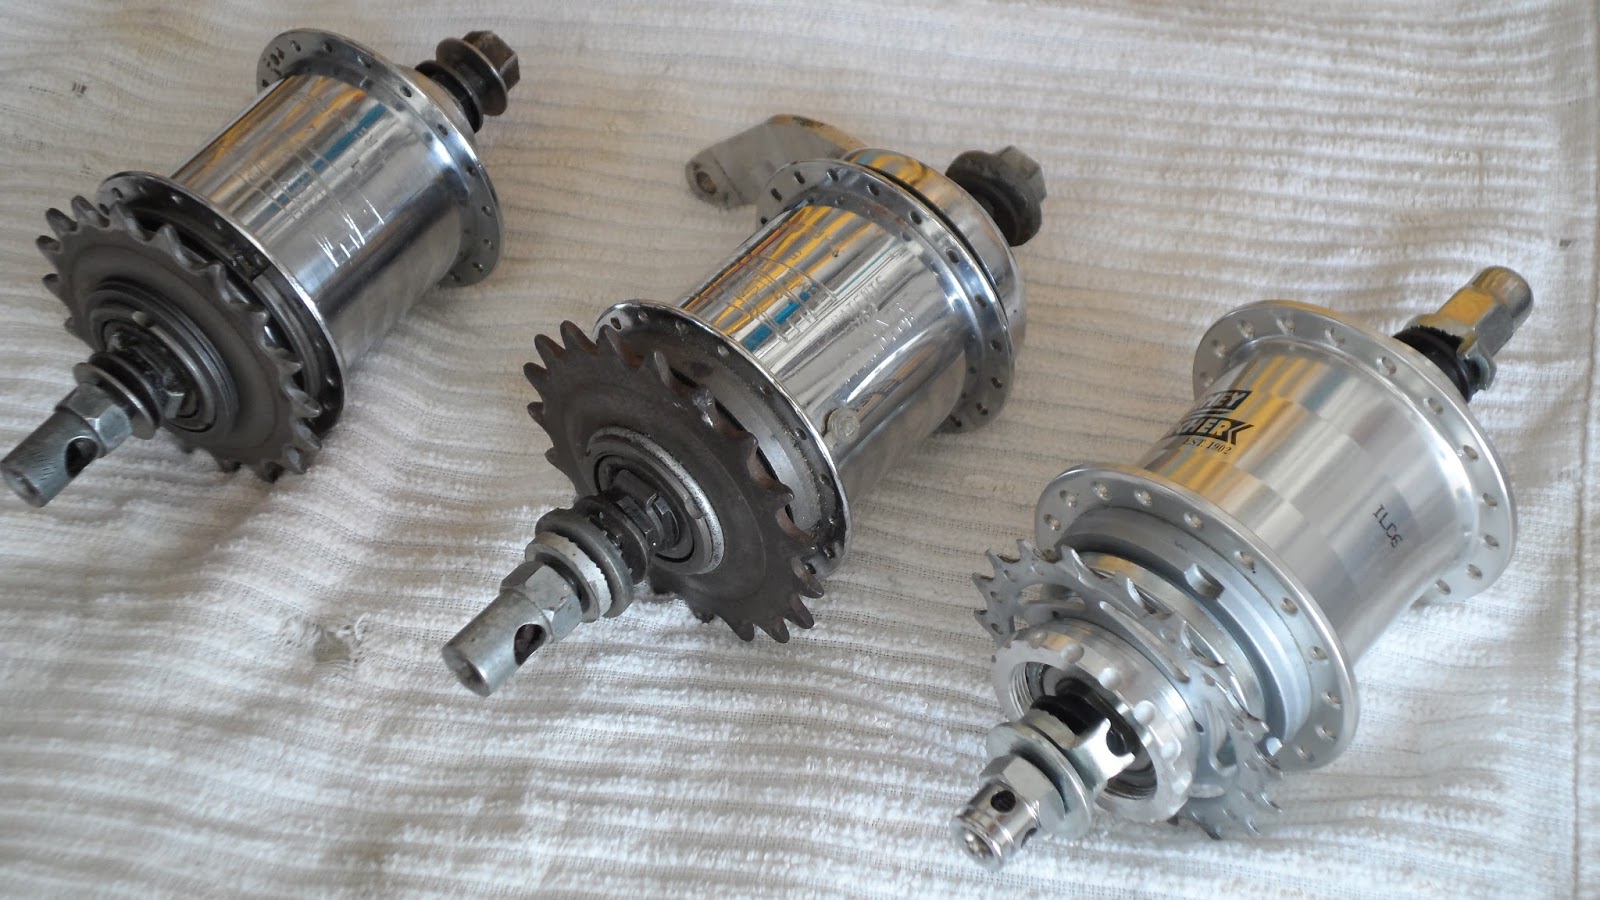
I have two projects going this year. One is the ongoing Schwinn Racer 3 speed I'm building up for an around-town bike. I finally got around to building up the new alloy wheels. When I had the old wheels disassembled, I realized I now have 3 different types if Sturmey Archer 3 speed hubs!
From left to right, the standard AW, a coaster brake 3 speed, and a fixed gear 3 speed!
I found a source of fairly inexpensive spokes, Danscomp.com, and got the stainless steel spokes I needed for 25 cents a spoke, (nipple included!). I used ExCel based Spocalc to compute the spoke length, but from experience, I deducted about 2mm from the program's recommended length. These were laced up to the SA hub and the Sun CR18 rims, (which are in the 650A, or 26 X 1 3/8 size). The wheel went together easily, (thanks Jobst Brandt!), and now my Schwinn has nice, light, straight wheels!

The Racer with it's new wheels!
The other project just popped up. I was browsing E-Bay, (always a potentially expensive habit), and I came across 2 frames that looked interesting. One was a really clean Trek, the other a very old Nishiki). Both were auctions so I decided to go with a bid. I wasn't going to spend more than $100, (plus shipping), so that was my top bid for the Trek, and it was the highest at the time.

The Nishiki looked a little forlorn, but I've been wanting similar to an old International to replace my Performance Ascent fixie, so I went with the starting $75 bid.

Well, my high bid for the Trek held out until literally the last minute when it got knocked out by two other bids. My Nishiki bid however, remained the only bid and I won the auction!

It took about a week for the frame to arrive. It was well boxed and I was surprised by the condition of the 40 year old bike. There was some rust on the bottom of the chainstays where a kickstand had resided. The chrome on the fork had some surface oxidation which came out with steel wool and solvent and Simichrome. Most of the paint still shined up well. The decals were in decent condition which is saying something for an old Nishiki. It appeared that the bike hadn't been ridden a lot.

Looking pretty good after initial cleanup!
But there was a significant problem. When I fitted the rear wheel, I found that the rear dropouts were only 108mm's apart! And with the wheel in the frame, it was definitely canted a little. I ran a string from one rear dropout around the headtube, and to the other dropout. It showed that the left hand stays of the rear triangle had been shifted over to the right by a centimeter! This could be the reason the bike hadn't been ridden a lot!!

Oh boy, we have a little problem here! Rear spacing should be 120mm!
Fortunately, this is a steel frame, so there is a way to fix it! I referred to Sheldon Brown's excellent page to learn how:   sheldonbrown.com/frame-setting

Here's the set up for cold setting the rear triangle. I eventually had to double up the 1X4 for more stiffness. Use a 2X4.
The frame straightened out just fine, and everything looks good now.

One idiosyncrasy of the early Nishiki's turns out to be the size of the stem diameter. They actually use a stem quill of 0.833 inch, the result of a failed attempt to reach a size standard in the early 70s. This size was shared by a few other manufacturers, notably Schwinn. Old Schwinn Le Tours have this size stem. I'm lucky I happened to have a pretty nice SR stem, a 90mm, that is that size.

Another problem came up when installing the headset. I was using a nice Shimano Ultegra I had laying around. The problem was with the fork crown race. This bike's race was the old JIS 27.0mm diameter, of course a good headset like the Ultegra has a race of 26.4mm! Now, in the past, you could take your fork to most any bike shop and they would mill the race for you. Now, alas, that is not the case. Both shops in Auburn couldn't do it! I finally solved this problem by simply slicing the thin Ultegra race, allowing it to expand to fit the Nishiki fork crown. (You can get away with this method if your headset uses cartridge type bearings). Still, kind of sad to think two "PRO" shops can't handle this kind of job! (By the way, don't even try to find a 3 speed part at these places either! Why do they think we all use the web for shopping now?)

Well, after all that, I stripped the Ascent and assembled the Nishiki into a complete bike. A short test ride showed that my frame straightening was successful, the bike tracked straight and handled well. I still have to set up the rear brake. The Tektro 538's have enough reach for the front wheel, but fall a bit short in the rear. I think I found a solution: AICAN-Aluminum-Brake shoe holder

Got the brake shoes in about 8 days, not bad for postal service from China. They are nicely finished little bits of aluminum, for sure. Here are some shots:

Here's a side-by-side comparison with the original brake shoe holder.
Here you can see you gain about a half an inch in reach.
Here's a view of the brake installed. Note that I still have room in the slot!
The Nishiki after it's first real test ride.
I've now had the opportunity to take several rides up to  20+ miles and am happy with this bike's handling. With the longer wheelbase and relaxed geometry, it's definitely more stable than the Ascent. Some would prefer the stiffer and twitchier Performance bike, but I like the more stable handling and shock absorbing ride of this steel frame. I find it more pleasant on level and downhill fixed gear riding, while climbing performance may be slightly less than on the Ascent, it is more than adequate for my use.

Wednesday, December 30, 2015

Evolution

March 2013
Since I received my King of Mercia touring frame in January of 2013, I have been constantly working on it, making small changes here and there to improve it's performance and capability and to improve, to my eye, it's appearance. I though it would be interesting to look at the changes I've made over the past 3 years.

Most all of these changes were not completely necessary, I have always tinkered with my bikes, its just something I enjoy. I think its natural to continue to modify your bike, even pre-assembled ones, (although its been a looong time since I've had one of those!).

September 2013
By September of 2013, I had given up on the V.O. 50.4mm crank, the first version of this crank couldn't work well with the front derailleur, (I understand that the newer version has fixed this problem). I replaced it with a V.O. 110mm compact crank I had on hand. Shifting was now fine but I was limited to a 34 tooth small chainring. V.O. mod 6 saddle was mounted for a while before I moved it to my fixed gear rig.

January 2014
By January of 2014 I had replaced the Dia Compe ENE shifters with some Shimano Sora 8 speed indexed shifters to ease shifting. Black handlebar tape replaced the old tan stuff and I think it looks much better! A slightly shorter stem is now installed. The Brooks B17 has returned.

July 2014
In July of 2014 I installed a Nitto M-12 front rack which allowed for a "Rando" style front bag. A longer front Tanaka fender, (actually a modified rear fender), gave more coverage.

March 2015
March 2015; a huge Carradice Camper saddlebag was added for overnight camping, along with a battery powered tailight. Not visible is an LED front light attached to the M-12.

December 2015
A "super compact" crank is now installed, giving me a sub-27 inch gear for climbing while still being able to use a short reach rear derailleur. Due to a failure of the rear alloy fender, SKS Longboards are now installed. 37c Continental Tour Ride tires, (actual width is 35mm), have replaced the 28c Pasellas for the time being. Shimano MTB SPD Pedals have returned.

"Side by side" comparison.
I don't know what changes are in store for the bike over the next year, I'm pretty content with the fit and the gearing now. Perhaps a more serious attempt at lighting.

Thursday, December 3, 2015

Another stab at an inexpensive super compact crank.


Sugino Messenger Racing Triple, re-purposed into a wide ranging double!

Some time last year, I had replaced the nice Velo Orange compact crank I had on my Mercian tourer with an older Shimano RSX triple crank, which I had converted to a wide ranging double by using the small, (74mm BCD) inner chainring and the middle 110mm BCD chainwheel for my big ring. See this blog entry: An economical super compact road crank.

The RSX triple converted to a wide range double.
While I was satisfied with the performance of this rig, it gave me all the right gearing and performed well with the rest of my drivetrain, it did lack a little in the looks department, plus flipping a big ramped and pinned ring over, (in order to recess the bolt holes), wasn't exactly elegant. I started scouting around for a decent looking replacement. I still wanted at least a 74mm BCD for the inner ring, but I realized that the 110mm BCD was not really needed for the outer ring, as long as I could find a 46 tooth ring for it.

I found the Sugino Messenger, a 130mm/74mm BCD triple at Universal Cycles that was cold forged and looked pretty nice. Also, it used a square taper bottom bracket which is the most useful for me. Unfortunately, by the time I got around to buy it, Universal had run out. I eventually found one on E-bay st a "Buy it now or best offer" and made an offer, $75 shipped, that was accepted. So I actually got a little better of a deal than if I had purchased it from Universal.

The Spirit of Japan! When I saw the box, I hoped the spider's arms were curved as shown. Alas, they were not.
Anyway, the crank arrived and it was pretty good looking. It came with all the bolts you needed to mount the double rings and the granny gear, which is neatly mounted directly to the machined back side of the crank. I had to order some track(single ring) chainwheel bolts and a 46 tooth outer ring. Fortunately, Sugino makes plain, unramped rings for this bolt circle size. I had a spare 26 tooth 74mm ring already on hand.

46/26 gear combination. The blue tape over the Sugino name was protection during shipping.
Installation went forward uneventfully. I used the same bottom bracket, a 120mm UN-54 I believe. Again, I reversed the large ring so that the inboard side of the bolts would be recessed. I used a slightly smaller granny, a 26 instead of a 28, so I figured I'd have to reduce chain length a tad so I removed one link. This worked well and I found that I could use up to 5 of my eight sprocket combos with the granny gear! The old unit only let me get away with three before I started rubbing against the outer ring! Now I have an even wider range of gears, with a sub-27 inch gear, (a 26/28 combo) for heavy climbing.

I'm very happy with how this turned out. for a cost of around $115, I was able to set this up. If you had to buy another chainring, the cost is still under $150. Still a pretty inexpensive crankset.


 With this new crankset my gear combination is now 46/26 in front and 11-28 in back. I find this gearing is just about perfect for my riding. I live in the Sierra foothills so I often have lots of climbing. This past Fall I did some loaded touring on this bike and found that even with the 46/28 combo of the older unit, I had a sufficiently low gear.

Full shot of the Mercian with the new crank installed.

Sunday, October 25, 2015

Bicycle touring to the Northern California Coast

Along Highway 1
It was time to get away for a bit and put a few miles on my bike. I decided to head to the coast this year, camping along the way and enjoy the fall weather along the Northern California coast.

As usual, my principal route planning was accomplished by pulling out an AAA regional map and hoping for the best! This time this method actually worked out pretty well!

The Mercian loaded for camping.
I found that I couldn't fit all the gear I would need for 4 nights' of camping into my Carradice Camper saddlebag and handlebar bag, so I went with rear panniers and the large Ostrich handlebar bag instead. I used a Nitto Campee rear rack which mounted to my read cantilever brakes' posts. This sturdy rack is advertised for 26" wheeled bikes, but it just fit on my 700c Mercian. However, I found that it held my larger panniers too far forward and they interfered with the brakes' movement so I had to use the smaller "front" panniers. I figured this would encourage me to pack as lightly as possible.

Off I went on a bright Thursday morning. My route would roughly follow Highway 20's path to the coast, but I tried to stay on quieter country roads as much as possible to avoid 20's traffic. I was able to keep mostly to side roads as far as Meridian on the first day. This included a couple of dirt roads which were a surprise, but in good repair. (One problem with AAA maps is that they sometimes don't indicate whether a minor road is paved or dirt.)
On Meridian Road.
After Meridian, I rode on 20 to Colusa, stopping for there for a quick lunch. Then continuing on 20 across the Sacramento Valley, I passed through Williams at Interstate 5, then up into the eastern foothills of the coastal mountain ranges. This stretch was one of the worst for traffic, with very little shoulder available at first. Eventually, after passing through the narrow canyon at the start of the climb, the road opened up and there was ample shoulder for a good distance.

I stopped for the night at a rest stop which happened to have a trail head collocated with it. I hiked up the trail a little bit and found a relatively level spot out of sight of the road. Here I set up "camp", merely a tarp laid out on the ground with my bivy sack and sleeping bag on it.

First night's bivouac.
Day2.

The next morning I was on the road early, delaying breakfast until I found water at Elk Creek in Lake County. Along the way I discovered that my attempt to correct the shimmy by changing the weight distribution actually made the problem worse! I had transferred some weight from the front to the back,  but instead of improving handling, I almost had a "tank slapper" on one steep downhill run, with my handlebars swinging back and forth! After coming to a stop, I resumed, making sure I didn't get to much speed on the downhills. Clearly, taking the weight off the front didn't solve my problem!

I was pretty low on water so I was looking forward to reaching Elk Creek. I found an area close to the creek to park the bike and hiked to the water. I filtered the water and made breakfast, (just cold cereal with instant milk, but it was really welcome!) After eating, I filled my water bottles. The filtered creek water was clean enough but had a bit of a gamy taste to it! Then, it was on to Clear Lake!

Clear Lake
Actually, the ride across the northern flank of Clear Lake was quite pleasant! Generally, the road had a generous shoulder and the condition of the paving was very good. A fresh breeze blew from the west, across the lake and made for very pleasant riding. Quite a nice change from summertime, when this area can be oppressively hot!

Continuing along Highway 20, I paused at Upper Lake and shopped at a farm stand, picking up some fruit for lunch. Apples and pears are plentiful this time of year. The pear was especially tasty.

Eventually, Highway 20 joins Highway 101 for a stretch up to Willits. I reached this part in the afternoon, and the long climb to Willits was hot work. I arrived in the town in the late afternoon, in what seemed to be rush hour. I needed some food and cool drinks so I stopped for a quick meal and picked up some extra water for the night.

I departed Willits via Highway 20 in the early evening and found a good campsite at a point near the 26 mile post heading to Ft. Bragg. It was another clandestine bivouac that night. That night I had some leg cramping and was a little worried that my schedule of a 5 day trip may have been a little too ambitious.

On Hwy 20, heading for Ft. Bragg.
Day 3.

The next morning had an inauspicious start, I had a flat! A small bit of wire had penetrated my tire. I swapped out the tube and headed off. The morning was cool and misty, I even encountered some very light rain as I rode the undulating terrain towards the coast. I made pretty good time though and was able to enjoy a hot breakfast at the Denny's on the far side of Ft. Bragg by 10 AM!

Outside of Ft. Bragg, I remembered that I wanted to adjust my load, so I pulled over and returned my load to it's original configuration. The bike had been a little touchy on the way to Ft. Bragg. After making the change, things seemed a little better. I also tightened the preload on the headset, something that has been said to help. With a thread-less headset, this was easy, (it would have been impossible with a threaded headset!)

As the ride progressed, I kept this configuration and never really had a problem again. (I did make a point of pressing my leg against the top tube during descents, maybe that solved the problem!)

Past Mendocino, I stopped at Albion. There was a small hardware store and an even smaller grocery store here. At the hardware store I picked up a spare tube of rubber cement since I only had one more spare tube, and my patch kit's cement looked kind of dry. At the grocery I picked up a coffee drink and a really excellent, fresh pastry.

I continued south on Highway 1, planning to stop for the day at Manchester State Park. I was disappointed to discover that the park is now closed. I did find some possible "hidden" spots, but I decided to see what I could find down the road. I wanted a sandwich for an early supper and was told that the closest sandwich shop was in Pt. Arena, so I headed down there.

By now the weather had cleared and was quite pleasant. There was a nice, consistent tailwind blowing from the northwest.

At Pt. Arena I enjoyed a great sandwich and a cold beer at the General Store. While there I met a young Frenchman, Jolis, (who went by the nick name Jo-Jo). He had a proper cycling guide to the coast and showed me where he planned to stay, at a State campground in Gualala. I rejoined Jo-Jo on the way to Gualala and we rode together to the park, where we shared the hiker/biker spot with another cyclist, Brian, from Seattle. Brian was a writer working on updating a cycling guide for the coast. We were later joined by a couple from Utah, the guy worked for QBP!(Quality Bike Products).

On Hwy 1
Day 4

I left Gualala around 8:00 AM, before any of the other folks did. In fact, Brian was the only guy up!  It was a little foggy in places, but not wet enough to cause any problems. The traffic was not bad at all, it was Sunday morning after all. After coffee at a small convenience store just below Salt Point, I cycled through some pretty dramatic scenery heading to Jenner. You have your forests to your right and a steep cliff dropping off on the right. At one point the road is reduced to a single lane, controlled by a stop light which holds traffic for 10 minutes, each way. This actually works out nicely because you can time the groups of traffic. I'd pull off and let the crowd go by, then I'd have 10 minutes of no traffic, the I'd pull over again for the next bunch and so on. For this stretch, it is actually kind of convenient.

Hwy 1, approaching Salt Point
I made it to Jenner at noon, right on schedule for lunch. Unfortunately Jenner was packed, so I decided to delay lunch until I reached Guerneville. Riding now on Highway 116, I followed the Russian River on a very pretty course inland. There was an adequate shoulder and the ride to Guerneveille was pleasant and uneventful. I found a cafe in town (the 3 Alarm Grill) with tables on the street and decided to lunch there. Had a very good hamburger and beer, then I was surprised by a second beer on the house! (A mispour the waitress decided the award me!) I was very happy with it, St. Florians, a delicious little beer indeed, but I was a little worried that a second beer would affect my riding since I still hoped to push on to Calistoga.

Well, the beer did not seem to bother me at all and I pressed on 116 until just before Forestville, where I made a left turn to get to River Road. This road was a real pleasant surprise! Beautiful, shaded with a wide shoulder, I enjoyed this route to the northern fringes of Santa Rosa at highway 101. After 101 the road name changes to become "Mark West Springs Road", and its charm disappears! Following this road is an endless climb with very little shoulder and an annoying amount of traffic for a Sunday afternoon. Finally, you catch a downhill run into Calistoga. I was pretty tired by now so I stopped at the first diner I saw and had a milkshake!

Now I had to find a place to sleep! My map indicated a State campground between Calistoga and St. Helena so I headed for it. It was starting to get dark so I was relieved to come to Bothe-Napa Valley campground, which had bike/hike sites!

Settling down at my site I was visited by Jack, an young Englishman who was car camping with friends. Jack had ridden the end-to-end ride, Lands End to John O'Groats! I think he was pleased to see my Mercian!

On Highway 116, along the Russian River.
Day 5.

I splurged on breakfast in St. Helena, then left town on the Silverado Trail, leaving the Napa Valley on highway 128 to Lake Berryessa. At first 128 had very little shoulder and the was some traffic. Fortunately both of these conditions changed for the better after the turnoff just past Lake Hennessey. The shoulder got wider and the traffic quieted down. there was a fair bit of climbing until about Markley Cove, then a wonderful downhill began which took me to Lake Solano.

On 128 in Napa County.
Finally going downhill, past Monticello Dam and, below the dam, along Putah Creek, which has some burned spots, but much is still untouched.
Monticello Dam, Lake Berryessa. 
Beautiful Putah Creek.
Day 5 The last push and hidden roads.

Reaching Winters, I stopped for lunch at Subway, enjoying icy cold beverages and filling my bottles, preparing for the final push through the Sacramento Valley. I've noticed that I really crave ice cold drinks on long rides, I get really tired of drinking warm water!

From Winters I took a series of rural roads which led me in between Davis and Woodland to county Road 102, (E8 on my tattered AAA map). This I followed to Knights Landing, where I then hopped on Hwy 113. My map showed Kirkville road which appeared to lead to Highway 99 just north of Nicolaus.

Turning onto Kirkville Road, I was relieved to find it was paved. A little rough but paved. I was a little worried since it was getting late in the day and if this road didn't work out I'd have to do quite a but of backtracking! Eventually the road rose up a levee wall and turned to dirt. My heart fell a little but the road seemed to continue, so on I went.

Kirkville Road/ Sacramento Ave.
On the other side of the levee was a small stream. As I crossed the bridge I saw a fellow fishing on the shore. I called out and asked of the road led to Hwy 99, and he said yes it did! What a relief! I continued on and soon reach the highway. Looking back at the road signs, I discovered that Kirkville Road had become Sacramento Avenue, (because it was now in Yuba county)!

 Now I was in familiar territory. riding through Nicolaus, I texted Shelly to give her an ETA. I stopped at East Nicolaus High School and filled my bottles at a drinking fountain. Finally pulling in at home in semi darkness with Shelly and my grandson Jayden sitting in the driveway waiting for me!

It was good ride. It was tough though, with the heaviest miles on the last two days. I couldn't track my miles with my phone because I couldn't charge it, but I would estimate 440 to 480 miles total. The longest day was the last one, I estimate at least 120 miles that day, but I was riding almost in the dark by the end.

The route was nice and varied, but quite challenging. I found the 28/28 low gear was low enough to handle everything I encountered.

As I had mentioned, the bike's performance was marred by the shimmy I encountered on the first and second days. I seemed to either have adjusted to the bike's handling, or by losing some of the weight as the days went by, perhaps the handling improved. I'll have to experiment with loads to find a solution.

Using a bivy sack saved a bit of weight and was pretty handy. As long as you expect dry conditions, this is an excellent option. It would have been another story altogether if it was raining!

One more equipment note: I used my "road" SPD pedals for this trip, Shimano A520's. While they functioned fine, I wished I had put on double-sided MTB pedals instead. They are more forgiving and allow you to "click in" faster when you're distracted by road conditions or traffic or what-have-you.  For the next loaded tour I will be sure to use the MTB style.

One postscript, I seem to have developed a wicked case of poison oak while camping! I really don't know how I made contact with it, but I had a bad case of it on my right side and shoulder.

Wednesday, September 30, 2015

Iowa Hill ride, with Finning Mill and Yankee Jims too!

On Finning Mill Road
Well, it was about time I got around to doing the Iowa Hill route this year, it's really a tough climb that needs to be done at least once a year to keep you humble. This year, I decided to try something different.

We often drive up to Sugar Pine Reservoir via Foresthill. Along the way the way I have noticed Finning Mill Road. It departs Foresthill Divide Road a few miles east of Foresthill, I then see the other end not far from the boat ramp exit at Sugar Pine. A Google search didn't come up with a lot of information. Google and Bing maps weren't very helpful either. I have a USFS map of the Tahoe National Forest which did show the road and it looked alright there, so I decided I wanted to try it.

This ride would encompass a fair amount of dirt road riding, as I planned to ride Finning Mill and Yankee Jims to get back to Colfax. I was riding my Mercian Tourer on which I recently installed Continental "Tour Rides", (described as 37mm wide but really about 34mm on my Sun CR18s). I was looking forward to finding out how they handled the dirt roads.

I drove up to Colfax and parked at the old Dingus McGee parking lot. Poor old Dingus McGee has been leveled, all that remains is the concrete slab, (BTW, found out that the roadhouse has re-opened in Auburn). Departing Colfax on Iowa Hill road, I dropped quickly to the North Fork of the American River. At the bottom I stopped to snap a picture when I discovered my rear tire was flat! A goathead sticker had punctured it right through the top surface! Not an auspicious start for my ride! It didn't help my impression of the Tour Rides either!

I swapped out the tube and then had to start that glorious climb to Iowa Hill. This climb is really, really tough. Good thing I had a 28/28 low gear. Even with no load, it's hard work to make it up that road. Eventually I made it to Iowa Hill where I met a couple of old guys who had passed me on trail bikes. They laughed because they said I almost kept up with them! We chatted and I asked them about Finning Mill. One of them said all he remembered was that it turned to powder during the summer thanks to the logging trucks. They had not been on it recently.

Nothing much happening at Iowa Hill Store today!
I didn't take a break at Iowa Hill this time, but pressed on to Sugar Pine.

I tried something different at Sugar Pine this year. I dropped down to the day use area which is adjacent to Big Gap campground. Earlier this year, we had camped at Big Gap and found the walking path around the lake to the boat ramp had been paved. So I road down and around the lake to the ramp and then back to the main road. Although this saves you from riding across the dam, I can't say you save a lot because you have a good climb before you get to the campground, and you have to watch your speed, the path is narrow and has lots of curves and you don't know if there will be somebody coming around the next blind curve.

Sugar Pine is very low right now.
Anyway, I got back on the road and was surprised to come to Finning Mill Road before the OHV staging area. Well, it looked okay at the start so off I went. I expected terrible, soft powdery sand but was surprised by a pretty good gravel/dirt road for the most part, with little washboard. I encountered just one short stretch of "powder" during the ride, at a road junction.

The start of Finning Mill, so far, so good!
The only navigation problem I encountered was at the junction of Finning Mill and Forest Service Road 24. As I was about to reach for my map, a fellow on a BMW GS came up, (the only traffic I met, save one car). I asked him where he came from and he asked me the same! After that, it was really just a matter of staying on the main dirt road and soon I came to Foresthill Divide road, a few easy miles east of Foresthill.

On Finning Mill. Notice the road surface is good!

The end of Finning Mill road at Foresthill Divide road.
I should mention that ever since Iowa Hill, a few raindrops were sprinkling down. It was keeping the dust down but was not heavy enough to cause puddling or even mud. When I got to the paved road I found the blacktop was wet! Something that hasn't happened since June! It felt funny to be riding under cloudy skies with no sun blistering down on me!

At Yankee Jims
From Foresthill I turned right and headed back for Colfax via Yankee Jims road. I've been on this road many times and have described it in this blog, so there isn't much to add. It was getting a little wetter as I headed down. Recently I have preferred going the other way on this road, descending on the north side of the river and climbing up this south side. I still do, you have a lot of tight turns to make going down this side so you have to ride your brakes more.

I take a picture of the Yankee Jim Bridge every time I cross it!
Going up the other side, the rain seemed to be getting a little harder. Still not a problem, but I was happy to have my fenders on the bike, they were being put to use at last! By the time I pulled into the parking lot the rain was coming down pretty steadily and I was starting to get wet, glad the ride was ending there.

I was pretty happy with this ride. It was fun to add an extra stretch of dirt road to it. Finning Mill was really a fine road. The Tour Ride tires felt pretty nice on the dirt and gravel, and they seemed to roll along on the pavement pretty nicely with 80 lbs. in them. I was disappointed that they punctured, but I don't know of any tire that can withstand a goathead, so that was just bad luck I guess. The Mercian took it all in stride, even with a large handlebar bag. Rides stats: 43.78 miles, 4 hours and 42 mins (!). 5520 feet of climbing.
Here's the ride as plotted by my Run the Map app.

The Mercian with the huge Ostrich bag!


Thursday, September 10, 2015

SKS Longboards for my Mercian

KOM with the beige Longboards
I mentioned in a recent post, (Bonus century!), my rear aluminum fender snapped off of my King of Mercia, (KOM). The fender failed at the point where it is attached to the rear bridge, (normally a brake bridge, but not on a cantilever equipped bike)!

Alu fender failure.
This is the second time a metal fender has broken on one of my bikes. Previously, a stainless steel fender had snapped at the same spot on my Motobecane Jury commuter. Obviously, I will have to rethink my installation of alloy fenders.
Close-up of the failed fender.
It would seem that there is need for reinforcement in that area. But I decided to try SKS composite fenders, which feature an aluminum center clad in plastic. I chose their Longboard version, the same I had used on my other Mercian, (Adjustments to the old Mercian.). It's nice that SKS offers a couple of colors, I again went with the beige, I just like that shade and it seems to go with the color scheme well enough.

Pretty good front fender line...
I wanted to be sure that the front fender was supported by the Nitto front rack, I positioned the front edge just a tad behind the leading edge of the rack. The Longboard is long enough that it still stretches down far enough to offer more than adequate protection.


...rear too!
Rear fender installation was greatly aided by the threaded points Mercian provided for mounting the rear fender. It was easy to set a nice fender line. I didn't install the rear mud flap, I'll save it for a spare.

A look at the rear installation.

And a look at the front, notice the attachment to the Nitto M-12 rack.
So, I've been riding with these new fenders for a few weeks now and I am very satisfied with them so far. They are rigid and quiet and fairly light. Lets see how long they hold up!

Monday, August 17, 2015

The Tivy Wheel Club, Williamsport, PA 1895

Front cover of the small circular.
After my folks passed away, I took possession of a box of ancient photographs from my great aunt Jennie Engleman, who herself had passed away many years ago. Among all the old pictures I came across this little gem, a short publication written for the 47th annual reunion  of the Tivy Wheel Club of Williamsport, Pennsylvania. This booklet describes the club's history and gives a very brief history of the bicycle itself. It contains lots of amusing and interesting tidbits about riding at the turn of the century, (the 20th century, that is!). 

It's also fun to note that while the Tivy Wheel Club was active for only 15 years, club reunions continued for at least 32 years!  

The paragraph entitled "FORECAST AGE OF HUSSLE", contains some pretty interesting stuff for us modern day cyclist, especially since fixed gear riding has made something of a comeback in recent years!

I hope you enjoy this little bit of history, click on each page to get an enlargement of the image.
The title page includes an inscription for Harvey Engleman, Jennie's late husband.