Friday, April 12, 2013

Foresthill, Yankee Jims, Colfax.

The finest view from a supermarket that I've ever seen!

I decided to take a day off to enjoy the beautiful Spring weather. What better way to appreciate the conditions than a bike ride? Today, I chose a rather challenging ride for me, a loop that would take me up to Foresthill, across the rough dirt of Yankee Jims road to Colfax, then return to Loomis via Placer Hills Road through Meadow Vista and Auburn.

 View from Old Forest Hill Road.
My route takes me through Auburn via Indian Hill road, then down and up Old Foresthill Road. I avoid the new road due to the endless seismic retrofit work which has been going on the massive Foresthill bridge for a couple of years now, with no end in sight! The lanes open are really too narrow for comfort. I made it up to Foresthill and stopped at Worton's market for a break and to enjoy the view. While there I met a couple of other older cyclists. One was riding an interesting Cervelo, he had a mountain rear derailleur on it which allowed him to use a 34 tooth cog in back. The bike was incredibly light, he said that with the small saddlebag, it weighed 16 lbs! The other impressive thing was the price! He said new ones were around $6,000! He got his used at half that! Wow, Shelly, I hope you appreciate how much money my retro tastes save us! After the break, I started down Yankee Jims Road. This starts with a brisk descent down a good road and eventually you come to the small hamlet of Yankee Jims. No services there. Shortly after that village, the road turns to gravel. This year, the road seems to be in pretty good condition. I believe Cal Fire had some work done during the terrible fire down there last year.

Yankee Jims Road; So far, so good.


At the junction of Yankee Jims and Shirttail Canyon. This is close to the point where the 2012 fire started that threatened Iowa Hill. Also a popular place for target practice evidently.

Plenty of water flowing now, here's a nice waterfall I hadn't noticed before. There's a nice pool at the bottom that would be great for soaking in!

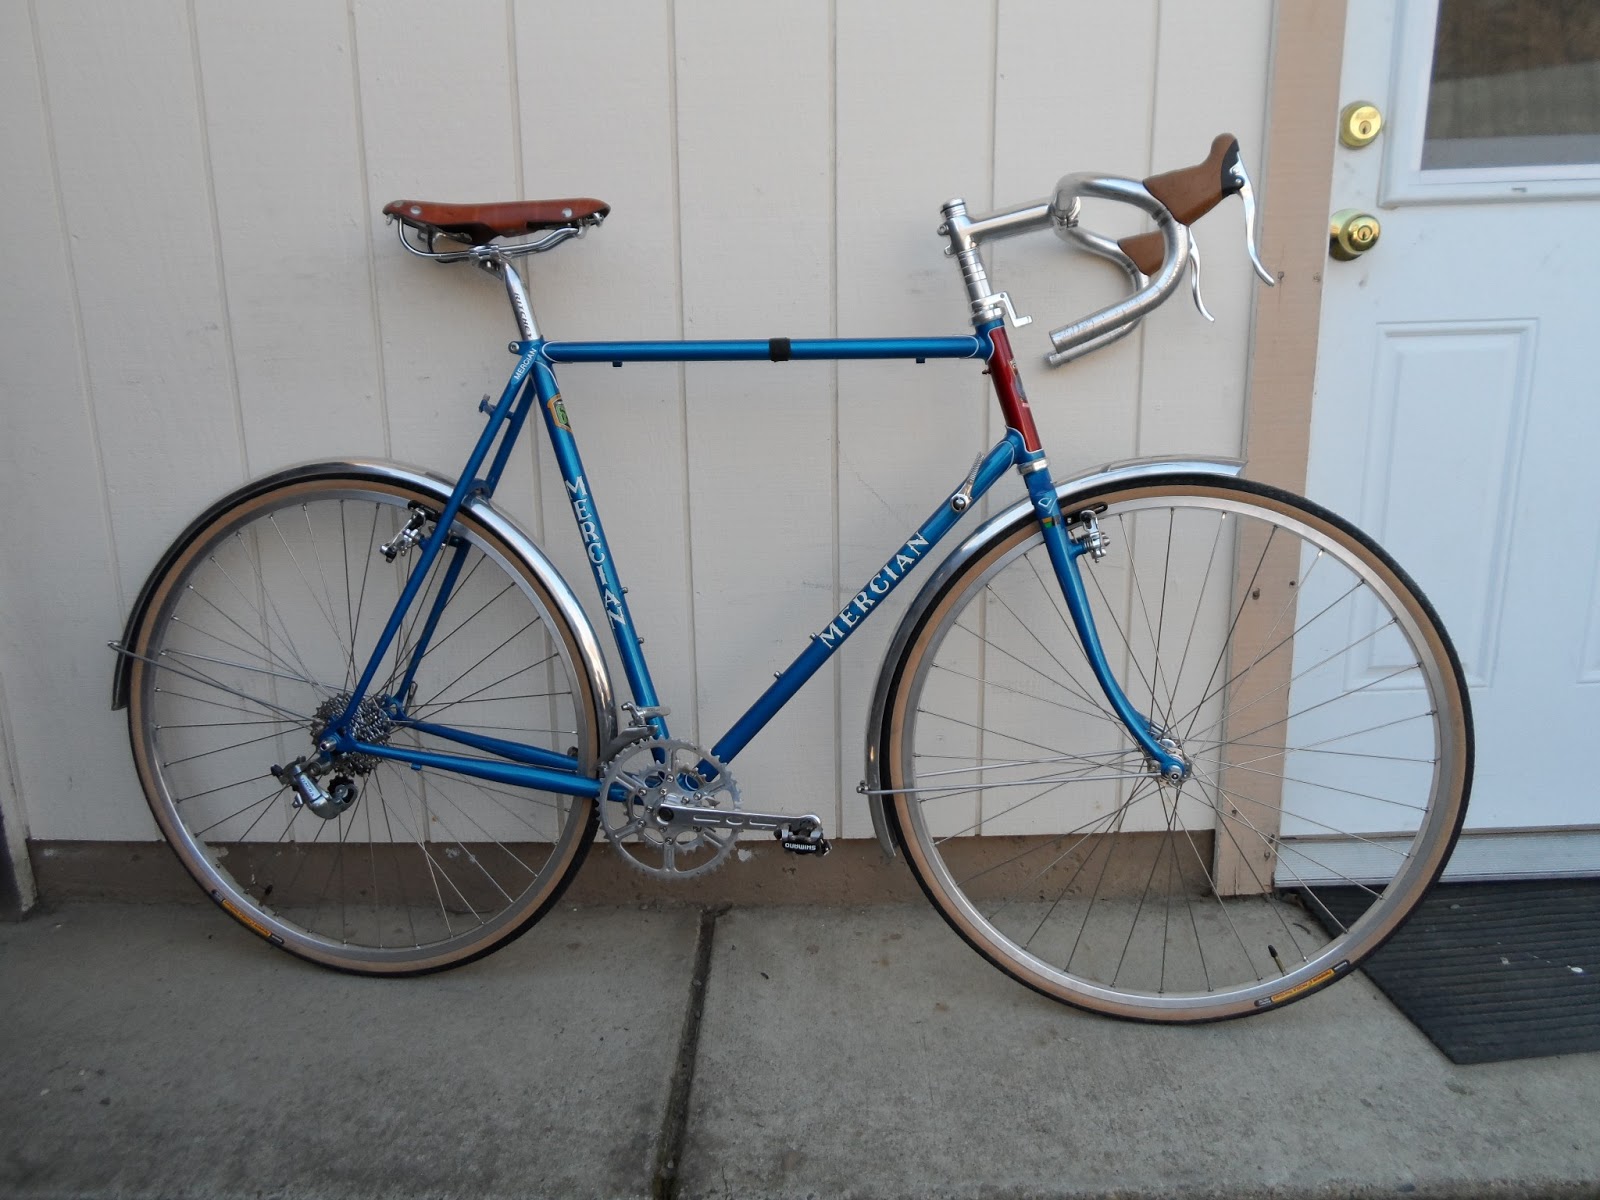
The background is a little busy, but I thought this was a nice shot of the Mercian.

Typical conditions of the rougher stretches of this road. Still, 28c tires were fine.

At the bottom, you cross the North Fork of the American. Here's a look back at the bridge.


Nice panorama; I'm looking back while on the north side of the river now, heading to Colfax.

Road conditions on the north side of the river were better than the south side.

Here I am trying to show the hillside covering of lupine and poppies.

Here's a close-up!

At the start of the pavement, on the way to Colfax.

Back on pavement, I headed for Colfax. I didn't actually go into town, but took the overpass south of town, up to Placer Hills Road. After a short snack break, I headed back to Auburn through Meadow Vista. Climbing out of Meadow Vista I felt the first tingling of a cramp starting in my inner thighs. Gearing down helped and after I started descending they went away and I didn't have anymore trouble.

The bike performed well. The bolt fixing the front fender to the underneath of the fork crown loosened a bit at the start of the ride. I tightened it and it held for the rest of the ride but I will need thread lock for that. It handled the dirt very well, even with 28c tires, it was stable and tracked well. Shifting was very good and my missed shifts are becoming rarer. I feel very comfortable on the bike even after the almost 7 hours I spent on it today!

Once around Folsom Lake


View from the new Folsom Dam Road

Circling Folsom Lake is one of my favorite training rides. I regularly do this a few times each year. Normally, I'll ride this route in a clockwise direction. I was amused to read in several online ride descriptions of this route that this was considered a more dangerous direction, due to the long, curvy and narrow climb up to Cool on Highway 49! Well, it makes sense although I've not had any problems. At any rate, I decided to try the other direction just for fun. This would be a long run on my new Mercian, still getting the bike dialed in.

At Placer School, on Horseshoe Bar Rd.

So I started the ride going up Horseshoe Bar Road out of Loomis, eventually getting on Auburn-Folsom heading south to Folsom. There, I turned on the New Folsom Dam Road. This is a very nice road with 2 sets of bike trails! One is completely separated from the road, it is used by bikes and pedestrians. It seems to me that you could get blocked by the slow traffic. I always take the alternate, a bike trail on the shoulder of the main road. I'm surprised they offer two choices, but it's nice!

Going by the dam; you can see riders on the second bike trail.

Past the dam you navigate residential and semi rural roads to Salmon Falls Road. Salmon Falls is really the heart of this ride. A long undulating climb to Pilot hill. Very pretty, not too busy. A favorite for squids on hot motorcycles. The road surface in generally excellent. The ride was eneventful, I enjoyed it. The climb up 49 from the river did not seem much safer than the climb up to Cool, though. Maybe a few more turnouts. Traffic was heavier because it was later in the day, since it's near the end of the ride going in this direction. Here are a few more shots, no more commentary.

 Salmon Falls Bridge, not sure what caused that blur in the photo.
On Salmon Falls road.
 "The Boat", I've seen this boat on every ride I've taken around Folsom Lake!
 The chimney is all that remains of this old farmhouse.
Yours truly, photo courtesy of the nice folks I met taking a break at Safari Estates(below).

I've often admired this particular view of the Sierra Foothills.
On highway 49 past Cool, dropping to the confluence of the forks of the American River.

Monday, March 25, 2013

Mercian's test ride...Meadow Vista loop!


Made it to the sign!

I finally had a chance to take the Mercian out for a true ride. Up to now, I had been assembling the bike and only took it down the block for testing. The other day, I rode it around a few local roads for more testing. Finally this weekend I was able to stretch it's legs for a good 4 hour ride through the Sierra foothills. I took a ride from Loomis, through Auburn up Placer Hills Road beyond Meadow Vista to Dog Bar Road. From there, I dropped down to the Bear river, then took Magnolia Road back to highway 49 at Lake of the Pines. From there, you take the roller coaster hills to North Auburn, then back to Loomis via Taylor Road. It was about 4 hours of riding, close to 60 miles. Unfortunately, I forgot my camera, so I have to settle for these phone camera pictures.
Lunch break at Dog Bar Road.
You might notice in the photo above, that I switched saddles for this ride. I didn't want to ride for 4 hours in a saddle not yet broken in!

The Bear River at Dog Bar Road Bridge.
Passes the no hands stability test!

As you can tell from the pictures, it was a fine day for riding. A little breezy at times, but not too bad. The air a little cool at first, but it warmed nicely by the end of the ride. The bike performed quite well. The drivetrain worked fine, I was concerned about the front derailleur clearance, but there was no issue. I occasionally missed a shift in the back but that was my mistake, the price of not using an indexed system.

The bike's ride is very good. The handling is quick, more like a racing bike than a touring bike. This is typical of Mercians.  Their geometry is decidedly sporty. This is a classified as a touring frame, but it's wheelbase measures 103.5cm,(40.75"), compare this to the Surly LHT with a wheelbase of 108cm,(42"). Added to this is a relatively short top tube. The result is a quick handling bike, I would say more a "Sportive" type geometry than a "Campuer"; I call it an English Randonneuse.  If you really want a Mercian tourer, better ask them for more chainstay and more top tube! Incidentally, I did notice a little toe clip overhang, also the result of the short top tube I suppose.

Riding the bike, I recalled the reason I like Mercians. Towards the end of the day, coming to Auburn on HWY 49 from the north, I was down in the drops and I felt perfectly comfortable. There is something in this geometry that puts my body in the right position. This, too, may be a result of the short (56cm) top tube.

The gearing consists of the Velo Orange Gran Cru 50.4 BCD crank, with 46/30 chainwheels, and a 11-28 cassette in the back. This gives me a very wide gear spread while still permitting a short cage rear derailleur, (in this case the Shimano Tiagra). I feel this range will be sufficient to tackle Iowa Hill if need be. I'll give it a try sometime soon I hope! The shifters are the Dia Compe ENE friction. These have a very light feel to them, lighter that the Rivendell "Silver" levers. I thought that the internals were identical between those two levers, but I can certainly feel a difference. 

Braking is certainly not a concern with this bike, the Tektro CR720 provide excellent stopping power. Probably overkill for this bike, but I also chose cantilevers for the generous clearance they provide for fender installation. The "Cane Creek" levers work very well with these brakes, and they are quite comfortable. Their quick release feature is also helpful.

All in all, I'm pretty pleased with the bike, but I want more time to get used to it's ride. I'll have at least one more journal entry about this bike and the whole process of obtaining it. 

Saturday, February 23, 2013

The Mercian's initial build

The Merc with most part installed, but not connected.

Both the wife and I are laying low due to colds, so I thought I'd post a couple of shots of the Mercian with most of the parts installed, but not yet connected. I've done an initial cut of the steerer tube, you can see I left a couple of centimeters on just in case. In the photo's the handlebars are set to saddle height. That's what I'm shooting for, but I will most likely keep the extra length if I decide it doesn't look too weird. The black cloth tape on the top tube is there to prevent the handlebars from smacking into the tube and marring the paint.

Profile shot!
Here's a list of the installed components:

- Tom Ritchey seatpost.
- Velo Orange Model 6 Saddle in honey.
- VO threadless stem with shim, 120mm.
- Cinelli Giro d'Italia handlebars, 40cm
- Cane Creek SCR-5 brake levers, (re-badged Tektros)
- Cane Creek S-2 threadless headset, 1"
- Dia Compe ENE shift levers
- Tektro CR-720 Cantilever Brakes front and rear, polished silver
- Shimana Tiagra 4600 rear derailleur
- Shimano RX100 front derailleur 
- VO Gran Cru crankset, 46/30 (50.4 BCD)
- VO bottom bracket, (122mm)
- Shimano SPD pedals, PD-M520
- Wheelset: Shimano Tiagra 4600 hubs, (rear re-spaced to 135mm), rim Sun CR18, polished
silver, Wheelsmith 14g stainless spokes. (36 rear, 32 front).
- Panaracer Pasela Tour Guard tires, 700X28c
- Tanaka Polished alloy fenders, 45mm*

Assembly and part selection notes:

Most everything has installed fairly easily so far. One thing with the ENE shift levers is that the lever stops seem to position the levers at a slightly "raised" position. Not sure if I can live with that.

I thought that the 122mm bottom bracket was going to be too wide, but it turns out to be just about perfect clearance for the chainstays. Update!! Turns out I had some chain clearance issues, had to go to 127mm!

I also thought a 120mm stem might have too long, but my initial calculations proved correct, the 120 puts the bars at the right spot.

I chose a NOS RX100 front derailleur to avoid using the shim needed in today's selection of FD's. Seems like nothing else has changed in FD design in recent years!

Ritchey "Classic" seatpost seems pretty nice. Very light, I thought I was getting a single bolt SP when I ordered this, then was excited to realize it was a "two bolt" design. Then I was not so excited to find that the two bolts are positioned side by side, not fore and aft as in, say the Campy NR of old. Still, it seems like a pretty nice post, I'll keep it!

I'm happy with the frame size this time. 60cm seems right for me. I'm experimenting with handlebar height and it will be a while before I have that nailed down. When I do, I may cut more of the steerer.

*A quick update- I was able to install my Tanaka Alloy fenders today. This will probably merit a separate posting someday as it is an interesting process! 

With the Tanaka 45mm Alloys fenders


Wednesday, February 13, 2013

The Mercian has arrived!

Fresh out of the box!
Last Monday I received an email from Mercian with the tracking information for my frame! I got to follow it from Nottingham to Loomis. The transit was amazingly fast, and the box was delivered to my door on Thursday!
Here's the box!
 

Here's a view of the wrapping
Head Tube Detail

Seat cluster.

Fork.

Nice bend to the fork blades.

Important sizing detail. (The last Mercian I had purchased was about 2 cm too small because I did not realize the point where the seat tube was measured to).

Well, it was pretty exciting to finally see the finished frame. I'm very happy with the finish. I have almost all the components on hand. It's now just a matter of getting time to assemble the bike. What fun!

Here's a link to the start of the assembly process.

Sunday, January 13, 2013

Surly Pacer 650B conversion

At Auburn State Recreational Area


Surly Pacer with 650B wheels.

650B wheels are a size between 26 inch and 700c. They used to be popular in France many years ago with cyclotourists and utility bikes. More recently, Grant Petersen of Rivendell revived interest in this size and has produced several 650B bikes. Jan Heine of Compass Bike has also helped drive interest in this tire size.

One popular result of this interest has been the conversion of 700C bikes to the 650B wheel. This allows the rider to mount larger width tires, resulting in a bike that is a bit more comfortable and versatile and can be used on rougher dirt roads.

It turns out that the Surly Pacer, already one of my favorite bikes, is a very good candidate for 650B conversions. The clearances are just about perfect for a relatively easy conversion. Basically, all that you need are the wheels and associated tires, tubes and rim strips, and a very long reach brakeset. Fortunately, all of this is now readily available and pretty affordable.

For brakes, you will need something with a reach in the range of 70mm. Tektro now makes several models, including the 556 and 559. These are both very nice looking and well made. I chose the 559's, making sure I got the recessed allen nut type. I found some on eBay for $45 shipped! 

Tektro 559's installed; lots of room!

As you can see from the picture, these brakes have ample reach, and there's lots of room for adding fenders, (which I hope to do eventually). Installation was straightforward, the only change I had to make was to shorten the cable housing about 1cm, the Tektro's needed a little bit more cable than the Campy Centaurs.

Next, of course, you'll need some 650B wheels. I wanted this experiment to be very cheap, so I searched on the web and found a wheelset for $65 on Amazon. Tires, tubes and rim strips were all ordered. The tires I chose were the Panaracer Col de la Vie, about $21 each. 

The wheels are certainly nothing special, Weinman rims (ZAC19?), with a bottom of the line Shimano freehub and some unknown up front, but this is more or less a trial, so I don't really care if they last forever. Everything went together, but the Col de la Vie's do not want to seat evenly, they have a slight hop from a couple of low spots. It's not really very noticeable when riding though, so I'll let that slide for now.

Update-I found a solution to the tire seating problem. Something I learned from mounting a motorcycle tire; I sprayed "Endust" furniture cleaner/polish between the tire sidewall and the inside wall of the rim. Then I pumped the tires up to about 80 lb's. pressure. That did the trick, now the Col de la Vie's seat well on these rims!

 Rear brake install. Note that there's still some reach left on these 73mm reach brakes!

A look at the front brake, again, plenty of reach left over!

A head-on shot of the front fork install. Note the clearance of the 38C tires.

The photo above shows the one limiting factor of the stock Pacer in fitting a wide range of 650B tires. The 38C Col de la Vies fit fine, but you would be hard pressed to fit anything much bigger. I have seen conversions which have replaced the front forks with some of additional clearance. Personally, I think 38C is wide enough for my uses of this bike. I'd be shopping for a Mountain Bike if I wanted anything bigger, anyway.

 Plenty of room in the back though!

Finally, with the work completed, it was time to ride! I took it over the hill to Lincoln and was pleasantly surprised by the feel. With 75 lbs in the tires, they felt responsive and fast! The bike tracked and cornered well. It almost seemed like I was riding at one gear lower than usual. I wonder if this was a result of the smaller diameter tires?


 After it's maiden flight!

All in all, I found this a worthwhile project. Total cost was about $170. I think it really expands the possibilities of the Surly Pacer. I anticipate adding some nice metal fenders and probably upgrading the entire wheel set. Adding a dynamo hub and lighting, this would make a very nice and economical randonneuring bike.

Saturday, November 10, 2012

Carradice vs. Zimbale saddlebag comparison

Carradice Pendle on the left, and the Zimbale 11 ltr bag right.

While at this year's North American Hand-built Bike Show, I spotted a vendor displaying English-style saddlebags!  These turned out to be Zimbale bags, imported from Korea. I had seen them on line before, I think Harris Cycles sells them. click here for Harris Cyclery's Zimbale page

At any rate, they seemed like nice looking bags, made of heavy cotton duck material. After looking around and chatting with the (very nice) people there, I discovered that they were selling some factory seconds at 50% off!  Well, of course I was hooked at that moment. The largest bag available for that deal was the 11 liter, it looked fairly big to me, I was hoping it would be the same size as my Carradice Nelson, my commuting bag.

The problems that caused these bags to be discounted were minor; Mainly, the screws fixing the bag to the wooden dowel were installed wrong, just missing the leather reinforcement underneath. It was a simple repair to relocate the screw.

Relocated the screw slightly to the left.

Another problem was that the wooden dowel used for support seemed too short to me. I picked up a short length of 5/8 inch hardwood dowel from ACE Hardware, just a couple of bucks. I cut it so the ends reached close to the corners, as in the Carradice.

 
Close up of the replaced dowel.

So for a little of my time, I got a $100 bag for $53! I think it's a pretty nice looking bag;

Zimbale 11 liter
Comparing it to my Carradice bags, I found that the 11 liter is just about exactly the same size as my Carradice Pendle, a bag I've owned for several years now. It, (the Pendle), has been a terrific bag, so I thought it might be fun to compare these two.
 Carradice Pendle

When comparing the two bags, the first thing you notice is that the Zimbale seems to have a lot more going on.  Notice the 2 sets of D-rings, really useful for external loading, like hanging a wet rain jacket. There are also 2 other plastic D-rings which would allow you to attach a shoulder strap for off-bike duty. Very neat, although I don't like plastic, wish they would have gone with metal there too. In contrast, the Pendle seems rather plain, albeit solid looking. Also, no plastic to see there at all!

Another nice feature in the Zimbale is the "long flap" which allows you to extend to top flap to accommodate a large load. This is a feature you find in Carradice's larger bags, the Nelson and Camper. Nice to see it here, although, to be honest, I've never needed it.
Long flap! Closed here...
Long flap open!
The shots above also illustrate the Zimbale's D-rings. Finally, one other unique feature for the Zimbale: a sort of quick release for the flap.
"Quick release" buckle.
The quick release allows you to open the bag with out messing with the buckle. Nice idea, although I wonder how well this feature would wear over time.

Up to this point, you would not be blamed for thinking, well so long Carradice! This bags got it all over you! But not so fast...there are some strengths in the Carradice bag that stand out. Also, some of the bling of the Zimbale seems only skin deep. The best example of this, I think, are the humble buckles!
Carradice buckle, simple, but carefully engineered and wonderfully effective.

Compare the two buckles above. The Zimbale certainly looks nice, but look closely. The buckle has no roller. It's just a very basic buckle. The Carradice buckle is a simple steel device but that roller is very important, it makes operation much smoother and relieves a lot of stress on the strap. finally, notice the thickness of the leather straps, Zimbale's are paper thin.

This is generally the advantage that the Carradice bag holds: quality where it counts. These bags are the results of many generations of English cycling experience. They are simple, and they are built to last.

Another example of this is found in the quality of the leather. After only a couple of months of use the straps holding the Zimbale to my B-17 show severe wear:

This shot doesn't show it well, but that strap is just about ready to let go! I installed zip ties to support the bag, otherwise they would have broken in half! To be fair, Carradice has brown leather straps that are also very thin, but at least they lasted a couple of years on my Nelson! The white Carradice straps are the way to go, they're very thick and last for years. i wonder what it is about non-white leather that makes them so skinny?

To sum up, these are both above average bags. They seem to be fairly close in price too. It would be a difficult choice to make. The Pendle is a very tough and reliable bag, you can use it out of the box with no change for years of service. The Zimbale offers some very nice features, especially the provision for outside storage of gear which the Pendle doesn't have. Some of Zimbale's materials are not up to the same standard or Carradice, but you can replace some of those easily.

Well, it's nice to have the choice!

Finally, here's some shots of what under the flap!

Inside the Zimbale bag. Notice the clip and strap which can draw the opening up.

Inside the Pendle: very basic. Both bags feature a nylon skirt w/drawstring.